Author: Scott Pletcher
In our last installment, we introduced Zero Trust Architecture as a thing and explained a bit about why it’s getting lots of attention. We introduced our modest starting-point app, ShowerThoughts Depot(TM), and our intent to refactor it to use some Zero Trust concepts. We also took our first step by replacing our localized user repository with Amazon Cognito.
In this installment, we will design a cloud-based network (AWS) for our application to help us compartmentalize and better protect our app from bad guys out on the internet.
Our To-do List
- 1. Implement a more robust and complete user management system with MFA capabilities
- 2. Build out some compartmentalization for the various layers.
- 3. Segment out some of the parts to scalable managed services.
- 4. Build firewalls and shields around our public-facing portions.
- 5. Intelligently log and monitor all the activity around our app.
There are many different ways to architect virtual private networks (VPCs) on AWS. Our application has a portion of it that is internet-facing and portions that never need to see the internet. Ideally, we don’t let DIRECTLY talk to our application but rather have them operate from behind some industrial-strength service. If we think about it, the ONLY things that need to be exposed to the internet are the React HTML files and our Thoughts API.
The Front End Plan
As the React HTML is static, we can easily host that on an AWS S3 bucket and enjoy all the robustness around that service. To make things even more resistant to shenanigans and more performant, we can put AWS CloudFront as a CDN, which will serve up cached versions of this static content from global locations closer to the users. Plus, if someone were to try to DDOS our application, CloudFront, as our “front door,” will step in and shut them down. This is the beauty of using some of these hosted services versus keeping everything on our own little server–we get the “group discount” for some of these defense features. In this case, we get that anti-DDoS feature free!
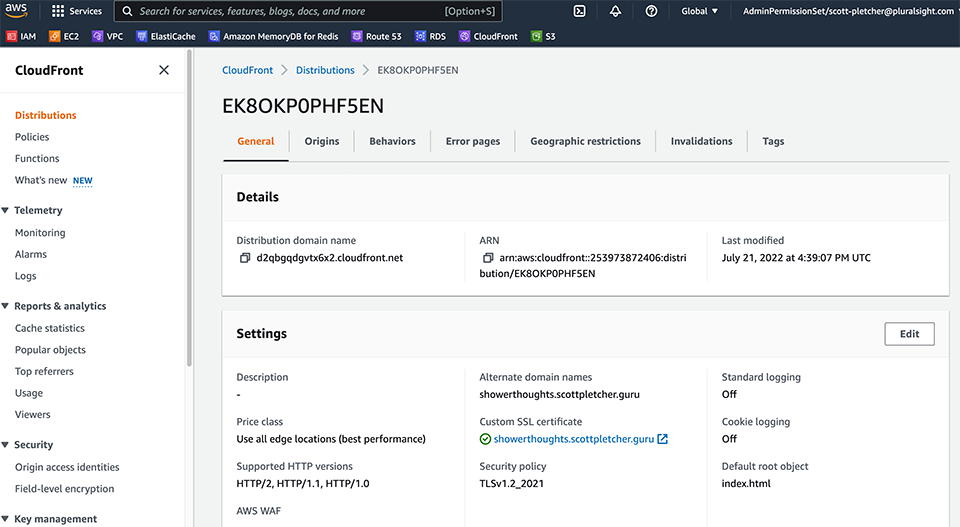
As we want to use our own domain for this, we need a domain–which we have…showerthoughts.scottpletcher.guru. As I want to make this seem legitimate, I want to create a TLS certificate for that domain that we can use with CloudFront such that when we serve up our HTML, it comes through as HTTPS. I head over to Certificate Manager and request a certificate for the domain, and I’m also going to add a subdomain to the certificate that we’ll use for the service layer: api.showerthoughts.scottpletcher.guru. Once I verify my domain ownership via TXT records, and the CloudFront distribution is deployed, I can now create an alias entry in Route 53 point back to our CloudFront distribution. Just like that, we have a globally scaled, resilient website.
The Other Layers
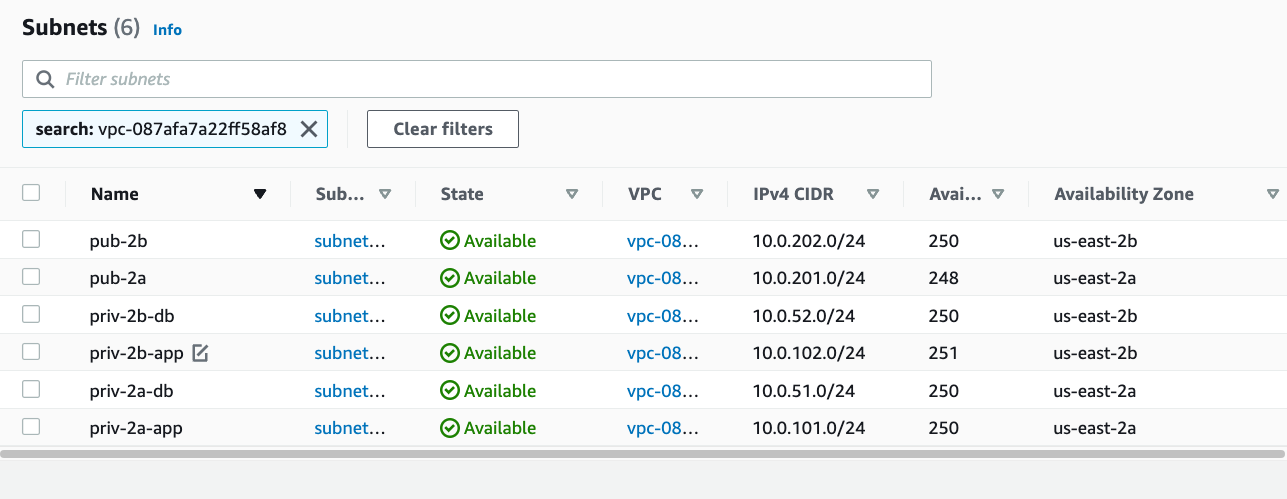
For our API and data store layers, we’re going to do something a little different. When I design VPCs, I prefer to use subnets to keep everything separated rather than create one big subnet and put everything in it. For our layout, I’m going to create six subnets altogether: two for our public-facing elements, two for our service layer, and two subnets for our persistence layer. At each layer, I created one each in different availability zones: US-EAST-2a and US-EAST-2b. Think of availability zones or AZs as different data centers across town from one another. By placing redundant resources in each AZ, we increase the reliability of our app in the event that one data center has an issue. Additionally, some AWS services, like the Application Load Balancer that I’ll use later, require multiple AZs. With my subnets configured, it’s time to allow them to talk to one another. Before I do that, I need to create an Internet Gateway that will provide internet access to the subnets of my choice.
Its route table time….and here’s what determines which subnets are “public” and which are “private”. I create one route table that simply routes between my private addresses (10.0.0.0/16) so all the subnets have paths to one another. Next, I create another route table, and I explicitly assign the two subnets that I’ll use for my public-facing elements, leaving the other subnets not assigned to this route table. I then create a route entry for all other traffic not destined for my 10.0.0.0/16 network to go out the Internet Gateway. That’s it…these two subnets are now public subnets. The remaining subnets have no route to anything but my internal 10.0.0.0/16 network, so they can’t reach the internet–nor can the internet reach them…directly.
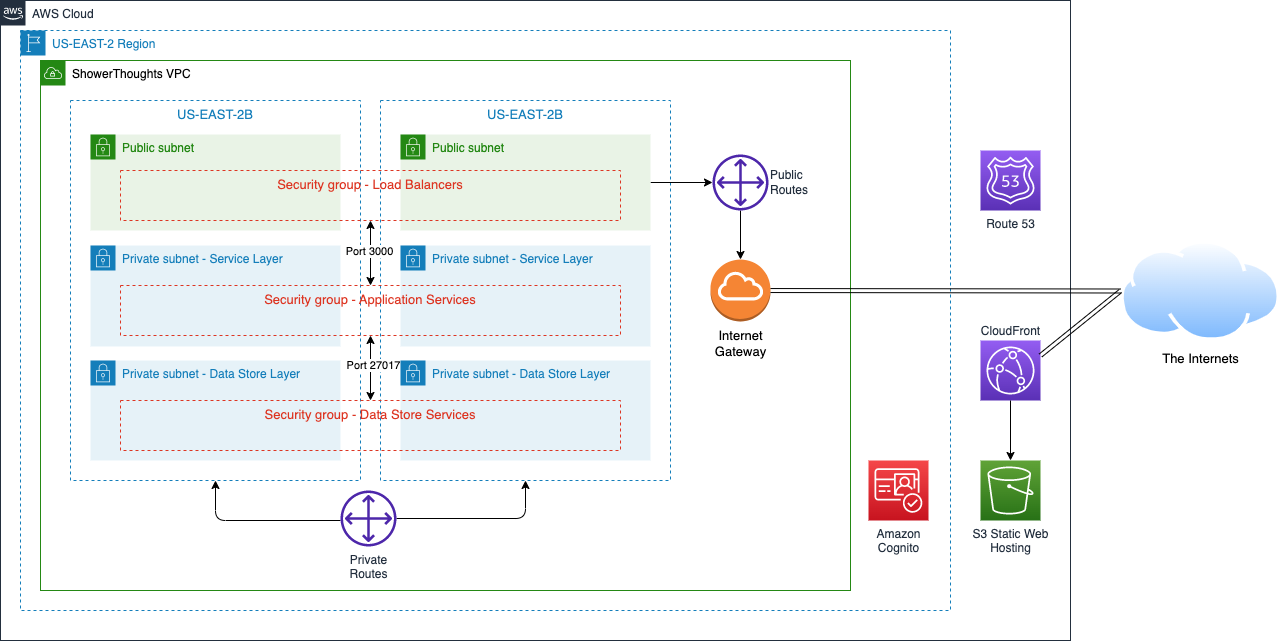
IF I wanted to provide internet access to my private subnets, I could do that with either a NAT Gateway that I’d drop in one of the public subnets. Say I wanted to provide internet access (via NAT) to only the application layer subnet. I’d create another route table and make an entry such that traffic for 0.0.0.0/0 (meaning everything else that you don’t have an explicit route for) should go to that NAT gateway…NOT the Internet Gateway. You have lots of flexibility and control so far, and this is just using subnets and route tables.
The next thing I set up are security groups. These are like mini-firewalls that can be assigned to resources within our subnets and they control what traffic can and cannot reach those resources. In our case, I’m creating three security groups: one for our load balancer (public facing), one for our application layer resources, and one for our datastore resources. At this point, I’m just creating them as we’ll soon need them for some resources we’ll create. Later, we’ll configure them for our desired traffic.
As an aside, I will usually also create Network ACLs to restrict traffic between my subnets to only the ports and IP addresses that I want. Some people say this is unneeded because of security groups, but I think it provides an important failsafe. By default, all traffic is allowed between subnets so long as there is a route. Now, security groups only protect resources when they are added to them so it’s entirely possible for someone to create a VM in a private subnet without a security group, leaving some zero-day exploit port open for attack from some other subnet in our vast network. It takes a little extra config and time, but I find it’s worth it for the peace of mind it provides.
Sans Servers…Almost
Now that we have our network and security groups setup, it’s time to standup some compute resources. We could pretty easily re-architect this application into a fully serverless app making use of AWS Lambda, AWS API Gateway, and DynamoDB, but I didn’t want this to get too abstract. We can save the serverless conversion for another blog. That said, I am going to use some managed services to make our lives easier and increase our security posture. If you recall, our starter application used a local MongoDB instance as the data store, so we know our code works with MongoDB. Turns out that AWS has a database as a service called DocumentDB that is MongoDB-compatible. We should be able to simply change over our connection strings, and everything just keeps working.
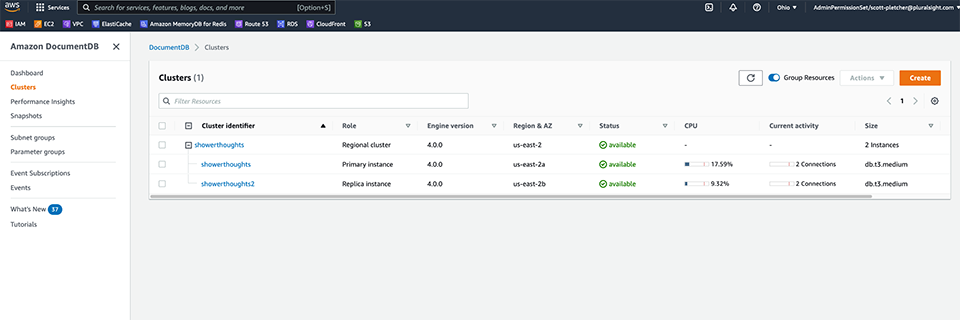
I’m going to start up a DocumentDB cluster of two nodes. I’m going to assign those two nodes into the private datastore subnets that I created earlier, making sure that each node lands in a different AZ. Now, one thing to note here that took me a while to figure out when I was debugging this… DocumentDB does not currently support public endpoints. This means that you cannot reach your DocumentDB instance from the internet, regardless of whether it’s in a public subnet or not. For security, this is great. For me trying to test my newly created datastore from my local laptop…not so great. Once I learned this fact, I stopped my local testing and spun up an Ubuntu server in the application layer private subnets, pushed my server-side code, and all was well.
For my public facing API, I don’t want to directly expose my Ubuntu server with the NodeJS process running on it. Rather, I want to use an Application Load Balancer. There are lots of benefits to running an ALB in front of your app–probably the biggest is that it will provide some level of security and protection against various internet-based attacks. I spin up my ALB using the two public subnets and then configure my target group to point back to my application layer server.
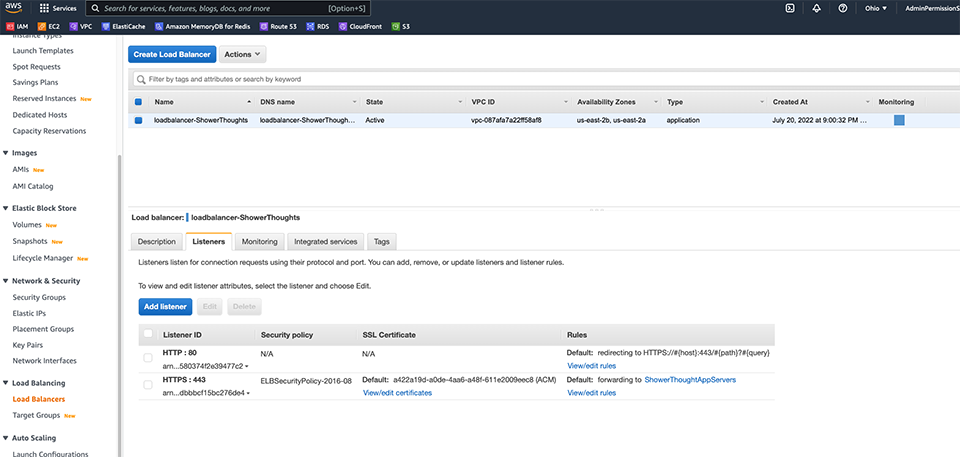
Do notice that the internet-facing port on the ALB is HTTPS and this is real important. If you recall, we are using JWT and we place those in the header of the HTTP messages. If left unencrypted, someone could easily sniff the message and extract the token and use it to pose as the owner. With a Bearer Token concept, this is the downside to what is a relatively simple authorization method. To guard against this, we need to be sure we use HTTPS–at least across the public internet.
To use HTTPS, we need to assign a certificate to the ALB. Remember back when I was setting up the static HTML portion and created that certificate for CloudFront? As I added that extra subdomain api.showerthoughts.scottpletcher.guru, I can also use that certificate here as well. To have HTTPS working property without getting “invalid certificate” messages in your browser, you’ll need to create a Route 53 entry for the ALB…I use an A record Alias to point to the ALB by name, and this will automatically update the underlying IP address in the record if they happen to change.
It would be best to use encryption from end-to-end, but I didn’t really want to mess with self-signed certs between the ALB and Express. (Remember, nothing from the internet will ever directly touch the application layer.) Once the message gets to the ALB, it’s sent via private IP back to port 3000 on the application server. Sure someone could spin up a server in one of our subnets and sniff for those messages, but they would have to breach our AWS account first…and if someone does that, we have bigger problems.
For the Zero Trust Purists, encryption would most definitely be a requirement as we really shouldn’t even trust our own staff to not set up a sniffer in that app server subnet. I’d probably rather just restrict deployment of resources into those subnets and have some auditing that instantly notifies if something other than our app server AMI pops up. I’d also use AWS Config to make sure our app servers are up to date and don’t have any new software installed without our knowledge. See, I told you you could probably do better than me!
Lockdown
Ok, now that we have everyone talking to one another and things working like they should, we need to scale back the communication allowed among resources to the bare minimum. For starters, we edit the security group for the DocumentDB resources to ONLY allow inbound traffic on port 27017 from members of the application layer security group. This effectively locks up our DocumentDB database to any other resources…which is good…because ONLY the application server needs to talk to the datastore. Next, we edit the application layer security group to ONLY allow inbound traffic on port 3000 from members of the load balancer security group. Finally, we edit the load balancer security group to ONLY allow inbound traffic from the public internet on port 443 (HTTPS) and port 80 (HTTP) which we redirect to port 443.
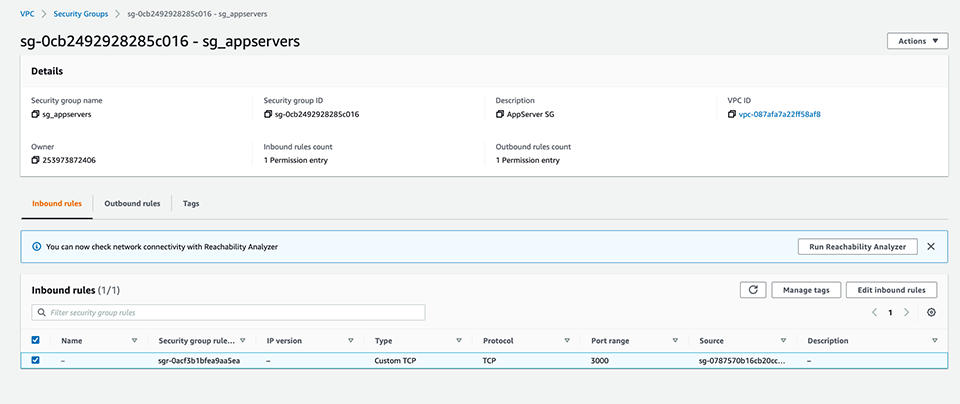
I usually don’t mess much with the outbound rules in security groups. If you’re really sure you know exactly which ports your apps use for outbound traffic, you can allow them and deny everything else, but this can be tricky. For outbound traffic, some services use the well-known ports from 0 to 1023 while many others routinely use ephemeral ports which can be anywhere between 1024-65535 depending on the operating system.
Ok, so where we stand now is a pretty compartmentalized application that’s way more robust and resilient than when we started. We also have a decent user management backend as well. In the next installment, we’re going to add some extra monitoring and protection on top of our existing resources.
