Author: Jeremy Morgan
Part five of a five part series on building a web application with Go. Get the Project source code here
Part 5: Deleting Records and Sending Options
In part four of this series we learned how to insert and delete records from our SQLite database with our Web API. In this article, we’re going to learn how to delete records and send Options info to clients requesting it. Let’s dig in.
In our router, we call
v1.DELETE("person/:id", deletePerson)
To delete a record. So we know we need to send a DELETE verb and put the id in the URI of the request. Easy stuff.
Step 14: Deleting a Record (deletePerson)
In models/person.go, we’re going to add a method to delete a record. Here’s the whole function:
func DeletePerson(personId int) (bool, error) {

	tx, err := DB.Begin()

	if err != nil {
		return false, err
	}

	stmt, err := DB.Prepare("DELETE from people where id = ?")

	if err != nil {
		return false, err
	}

	defer stmt.Close()

	_, err = stmt.Exec(personId)

	if err != nil {
		return false, err
	}

	tx.Commit()

	return true, nil
}
If this looks familiar, it’s because we’ve used this same pattern previously.
func DeletePerson(personId int) (bool, error) {
We declare the DeletePerson function and pass in an integer for the id. We return bool if it was deleted and an error. If the method is successful, we return true and nil for the error. If it fails and we’re able to capture the error, we’ll return false and the error message.
tx, err := DB.Begin()
We’ll start a transaction as we did in the last step.
if err != nil {
	return false, err
}
If an error is thrown, we’ll catch that and return false plus the error.
stmt, err := DB.Prepare("DELETE from people where id = ?")
We’ll prepare our statement as before with a placeholder for id.
defer stmt.Close()
Then we’ll defer the close statement.
_, err = stmt.Exec(personId)
We then execute the statement with our personId that we passed into the function.
tx.Commit()
We then commit the action
return true, nil
And if everything is good, we return true, with nil for the error so the calling function knows it was successful.
Great! This method is now complete. Now let’s open up main.go again.
Step 15: Calling DeletePerson
In main.go, we’re going to create a method to call the method we just created. This will be triggered by a DELETE to our /api/v1/person/:id URI.
Here is the full function:
func deletePerson(c *gin.Context) {

	personId, err := strconv.Atoi(c.Param("id"))

	if err != nil {
		c.JSON(http.StatusBadRequest, gin.H{"error": "Invalid ID"})
	}

	success, err := models.DeletePerson(personId)

	if success {
		c.JSON(http.StatusOK, gin.H{"message": "Success"})
	} else {
		c.JSON(http.StatusBadRequest, gin.H{"error": err})
	}
}
This pattern should look familiar to you as well, it’s very similar to the previous call we made for updating.
func deletePerson(c *gin.Context) {
We declare the deletePerson function and pass in the Gin context.
personId, err := strconv.Atoi(c.Param("id"))
Then we grab our personID from the URI.
if err != nil {
	c.JSON(http.StatusBadRequest, gin.H{"error": "Invalid ID"})
}
If that fails for any reason, we’ll let the caller know that it was an invalid id.
success, err := models.DeletePerson(personId)
We then execute the call to DeletePerson function, passing in the id we grabbed from the URI.
if success {
	c.JSON(http.StatusOK, gin.H{"message": "Success"})
} else {
	c.JSON(http.StatusBadRequest, gin.H{"error": err})
}
If it’s good, we’ll let them know. If not, we’ll throw a 400 with the error message.
Let’s run it!
Running the Application
So now we have the function, and we’re calling it let’s run the application:
go build
./personweb
Now we’ll send a DELETE with an id of 1001 (the record we created previously):

And it’s successful. Let’s try to look it up:
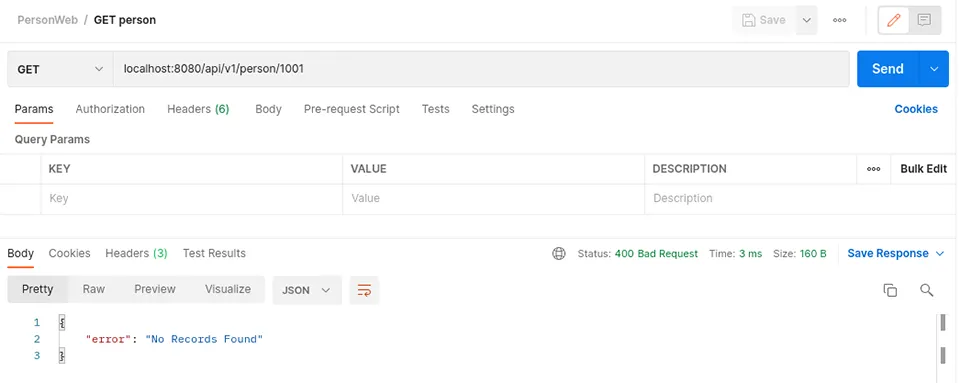
Great! Now we can delete records.
Note: Engineering design alert! This isn’t the only way to do this. Many designers favor “disabling” instead of deleting. This is great for record keeping and reversing an accidental delete. The pattern is to have an active/inactive flag on the record, and when someone “deletes” it, the record becomes inactive. This will use more space in your database, but the tradeoffs are often worth it. We’ll cover it in a future article.
Now, for the final step of our application, let’s send some Options.
Step 16: Sending OPTIONS
This is an optional step for your API (see what I did there?), but it’s a great feature. When a caller sends an OPTIONS verb, they want to see what features are available from your service. This is a courtesy for other developers and sets rules for browsers to follow.
Here is more info about OPTIONS if you’re curious.
It’s easy to set up and send from our API. With main.go still open, let’s add the following method:
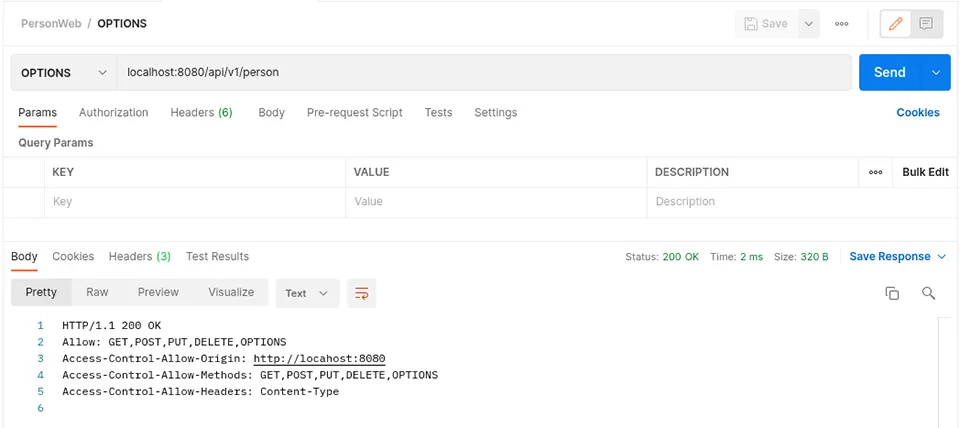
func options(c *gin.Context) {

	ourOptions := "HTTP/1.1 200 OK\n" +
		"Allow: GET,POST,PUT,DELETE,OPTIONS\n" +
		"Access-Control-Allow-Origin: http://locahost:8080\n" +
		"Access-Control-Allow-Methods: GET,POST,PUT,DELETE,OPTIONS\n" +
		"Access-Control-Allow-Headers: Content-Type\n"

	c.String(200, ourOptions)
}
As you can see, options is simply a string. We send it out letting developers know:
Allow: GET,POST,PUT,DELETE,OPTIONS
These are the verbs we allow. Remember OPTIONS doesn’t enforce this, it simply advertises it to developers.
Access-Control-Allow-Origin: http://locahost:8080
This is our access control to show which origins are allowed to access the code. It could be *, or a specific domain. Browsers will check this when making a request.
Access-Control-Allow-Methods: GET,POST,PUT,DELETE,OPTIONS
This is similar to the allow above, however this is enforced as browsers will check this when making a request.
Access-Control-Allow-Headers: Content-Type
Here we can specify which headers we’ll accept.
c.String(200, ourOptions)
And here, we’ll send it out as a string with a code of 200 (OK).
Now when we send an OPTIONS verb, we get this result:
Awesome!!
Summary
This was a long journey, but you’re now able to develop Go applications using Gin and SQLite! Here’s what we’ve learned:
- How to build a Web API with the Gin Web Framework
- How to create, read, update, and delete records (CRUD) with SQLite and Go
- How to connect your API to a SQLite Database
So you now know how to build fully functional APIs with Gin, and your API can be connected to a small, performant SQLite database. Good job!
If you’d like to learn more about Go, here are some great courses to take your skills to the next level:
Course: Creating Web Services with Go
Project: Build a FIFA World Cup Web Service in Go
Project: Build a Temperature Converter CLI in Go
Course: Buiding Distributed Applications with Go
Bookmark this site, because we’re going to add to this project and deploy it in containers and cloud services. We’ll help you get your Go web services skills leveled up!
If you have any questions Feel free to reach out to me anytime.
Series: Building a Web App with Go and SQLite:
- Part 1. Create a Gin Web API Service
- Part 2. Connect to our Database
- Part 3. Selecting a Single Record
- Part 4. Inserting and Updating Records
- Part 5. Deleting Records and Sending Options (this page)
How much do you know about Go? Find out your Go SkillIQ here! Take a free skill assessment.