Author: Jeremy Morgan
Part four of a five part series on building a web application with Go. Get the Project source code here
Part 4: Inserting and Updating Records
So now we know how to select a batch of records and a single record. Let’s look at how to insert a new record, as well as update it if we want to make changes later.
The process to insert a record looks like this:

In this process, we just need a JSON object, sent as a POST, and we’ll process it and create a new record from it. Here’s how.
Step 10: Adding a Person to Database (AddPerson)
Open up models/person.go, and we’re going to add a new method. Here’s the full method:
func AddPerson(newPerson Person) (bool, error) {

	tx, err := DB.Begin()
	if err != nil {
		return false, err
	}

	stmt, err := tx.Prepare("INSERT INTO people (first_name, last_name, email, ip_address) VALUES (?, ?, ?, ?)")

	if err != nil {
		return false, err
	}

	defer stmt.Close()

	_, err = stmt.Exec(newPerson.FirstName, newPerson.LastName, newPerson.Email, newPerson.IpAddress)

	if err != nil {
		return false, err
	}

	tx.Commit()

	return true, nil
}
Let’s walk through it step by step.
func AddPerson(newPerson Person) (bool, error)
First, we declare the function and take a Person struct as an input. We’ll return a bool and error from it. The bool will indicate whether the insertion was successful or not. If it’s false, we can assume it didn’t insert. If the reason we failed can be caught as an error, we’ll return that as well.
If the insert was sucessful, we’ll return TRUE and nil for the error.
tx, err := DB.Begin()
Here we will start our transaction with DB.Begin()
We’ll catch the errors if there are any. Note how we’re doing this:
if err != nil {
	return false, err
}
If we have an error, we set the outgoing response to false and populate the error. That way, the code calling this method knows it failed and why it failed.
stmt, err := tx.Prepare("INSERT INTO people (first_name, last_name, email, ip_address) VALUES (?, ?, ?, ?)")
Next we’ll prepare our SQL statement for execution. Notice we are specifying each field we want to populate with ? placeholders for the data. We omit the id field here because it will be autogenerated by the database. We are preparing the statement to prevent SQL injection attacks. In some cases, it also helps to precompile a SQL statement so it can be reused. If possible, always prepare your SQL statements first.
defer stmt.Close()
Here we defer the closing of our SQL statement to ensure it’s closed once the function completes.
_, err = stmt.Exec(newPerson.FirstName, newPerson.LastName, newPerson.Email, newPerson.IpAddress)
Then we execute our statement. Here we need to pass in values to be inserted into the database. We bind the input fields from the struct that was passed in. This data initially came from the JSON sent in the POST. We catch any error that may arise.
tx.Commit()
Finally, we’ll commit that transaction to our database. We can assume by this point that all is well.
return true, nil
So we return true to indicate it was successful, with no error message.
This method is now complete. Now let’s open up main.go again.
Step 11: Calling AddPerson
In main.go, we’re going to create a method to call the method we just created. This will be triggered by a POST to our /api/v1/person URI.
Here is the full function:
func addPerson(c *gin.Context) {

	var json models.Person

	if err := c.ShouldBindJSON(&json); err != nil {
		c.JSON(http.StatusBadRequest, gin.H{"error": err.Error()})
		return
	}

	success, err := models.AddPerson(json)

	if success {
		c.JSON(http.StatusOK, gin.H{"message": "Success"})
	} else {
		c.JSON(http.StatusBadRequest, gin.H{"error": err})
	}
}
Let’s take a closer look.
func addPerson(c *gin.Context) {
Here we declare the function and pass in the Gin context, as we have with previous methods. This is called when a POST is sent to /api/vi/person.
var json models.Person
Then we’re going to create another instance of the Person struct, and we’ll name it json.
if err := c.ShouldBindJSON(&json); err != nil {
	c.JSON(http.StatusBadRequest, gin.H{"error": err.Error()})
	return
}
Here we are changing up the call from our usual way of doing it to show another style. Here we just say if there is an error, handle it, if not move on.
We are calling ShouldBindJSON and adding a pointer to our json struct. What this does is take any JSON sent in the BODY of the request and attempts to bind it to our struct. If it cannot, it will throw an error because we know we can’t go any further.
success, err := models.AddPerson(json)
Now we know the JSON sent matches our struct, so we pass it into the AddPerson method we just created. Since we return a bool and (maybe) an error message, we will create a success bool to work from. We hope that it’s always true. If it is, that means our JSON was inserted into the database.
if success {
	c.JSON(http.StatusOK, gin.H{"message": "Success"})
} else {
	c.JSON(http.StatusBadRequest, gin.H{"error": err})
}
If the operation was successful, we’ll return a 200 with a message of “Success”. If there was a problem, we’ll send a 400 with the error as a message.
Running the Application
So now we have the function, and we’re calling it let’s run the application:
go build
./personweb
We will send a POST to /api/v1/person and include the following JSON in the body of the request:
{
    "first_name": "Jeremy",
    "last_name": "Morgan",
    "email": "jeremy-morgan@pluralsight.com",
    "ip_address": "127.0.0.1"
}
Make sure it’s encoded as text/JSON and we’ll send it:
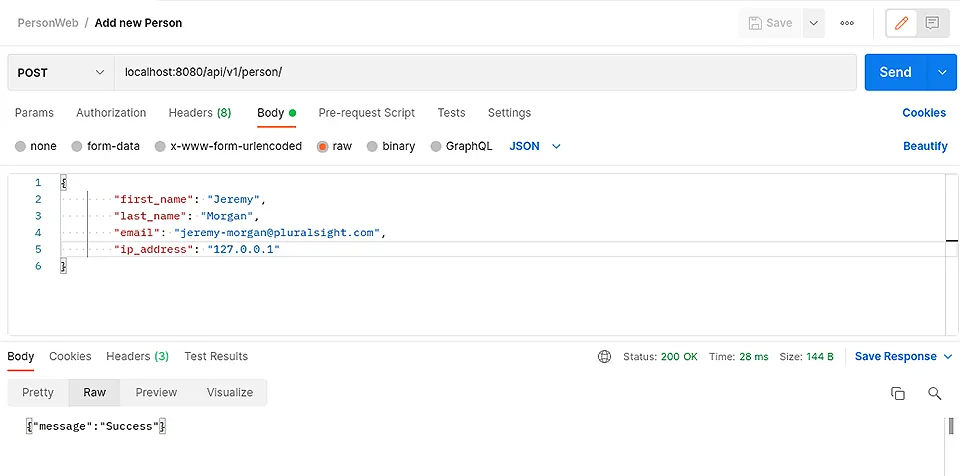
Perfect! Now it has been inserted into the database. Let’s verify that. I’ll send a GET to /api/v1/person/1001 (my id)
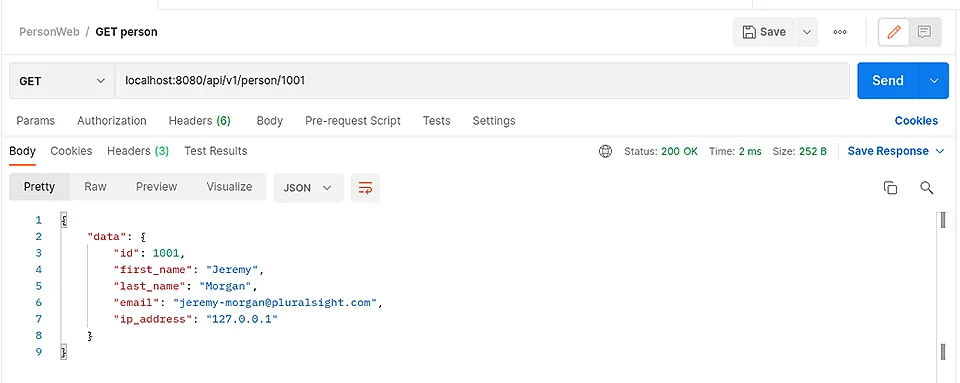
And there it is!!
We have successfully built the functionality to insert a new record into our database. Now let’s update it.
Step 12: Updating a Record (UpdatePerson)
Next, we’ll update a record. This is done much in the same way as inserting a record. We’ll send a PUT to /api/v1/person/{id} and send JSON that reflects what we’d like to update.
We’ll need to open up models/person.go for this portion.
Here is the full function:
func UpdatePerson(ourPerson Person, id int) (bool, error) {

	tx, err := DB.Begin()
	if err != nil {
		return false, err
	}

	stmt, err := tx.Prepare("UPDATE people SET first_name = ? last_name = ? email = ? ip_address = ? WHERE Id = ?")

	if err != nil {
		return false, err
	}

	defer stmt.Close()

	_, err = stmt.Exec(ourPerson.FirstName, ourPerson.LastName, ourPerson.Email, ourPerson.IpAddress, ourPerson.Id)

	if err != nil {
		return false, err
	}

	tx.Commit()

	return true, nil
}
Let’s dig in.
func UpdatePerson(ourPerson Person, id int) (bool, error) {
First, we declare the function the same way we did the insert, only now we have an additional parameter for the id.
We pass in a Person struct with the information we’d like to update, then the id it corresponds to.
Then we return a bool and an error if we have one.
tx, err := DB.Begin()
Then we’ll start another transaction.
if err != nil {
	return false, err
}
Then we’ll catch the error the same way we did before. If we have an error, we’ll return false and the error message.
stmt, err := tx.Prepare("UPDATE people SET first_name = ? last_name = ? email = ? ip_address = ? WHERE Id = ?")
We’ll prepare a statement, similar to the way we did before. We want to update the first name, last name, email, and IP address at once, where the Id matches ours.
Yes, we are updating every field in the record, even if only one of them changes. The advantage to this is you can change all the fields at once, instead of individually. This is a design choice. You can use JavaScript or another method on the front end and make it update only one field individually. This will make a faster transaction, but in my opinion isn’t worth the added complexity. There isn’t much of a performance gain from doing them individually.
defer stmt.Close()
again we defer the close statment.
_, err = stmt.Exec(ourPerson.FirstName, ourPerson.LastName, ourPerson.Email, ourPerson.IpAddress, id)
Here we execute the statement, and once again, we’re binding to the struct that we passed in for the values.
We also pass in the id at the end to identify the record we’d like to update.
There is additional input filtering you can perform here. On a production application, I would suggest that, but for learning purposes, this will do.
tx.Commit()
Then we commit the transaction. Updated!
return true, nil
We assume all is good here, so we’ll return true and nil for the error.
Great! Now we have a function on our model. Let’s call it!
Step 13: Calling updatePerson
Now we need to call this method. It’s nearly identical to AddPerson, only now we’re taking an id from the URI.
Here’s the full method:
func updatePerson(c *gin.Context) {

	var json models.Person

	if err := c.ShouldBindJSON(&json); err != nil {
		c.JSON(http.StatusBadRequest, gin.H{"error": err.Error()})
		return
	}

	personId, err := strconv.Atoi(c.Param("id"))

	if err != nil {
		c.JSON(http.StatusBadRequest, gin.H{"error": "Invalid ID"})
	}

	success, err := models.UpdatePerson(json, personId)

	if success {
		c.JSON(http.StatusOK, gin.H{"message": "Success"})
	} else {
		c.JSON(http.StatusBadRequest, gin.H{"error": err})
	}
}
We add this to get the id:
personId, err := strconv.Atoi(c.Param("id"))

if err != nil {
	c.JSON(http.StatusBadRequest, gin.H{"error": "Invalid ID"})
}
This takes c.Param("id") that we get from the URI, and converts it to an integer. If there’s no error with that, we move on. If there is an error, we’ll return a bad request, with the message “Invalid ID”.
Once again, we’re creating a struct and binding it to the JSON that exists in our context, then passing it to UpdatePerson. We return a success or fail message based on the result.
So let’s try it out!
Running the Application
So now we have the function, and we’re calling it let’s run the application:
go build
./personweb
Here I’m going to change every field to make sure it works.
Our old record looks like this:
{
    "first_name": "Jeremy",
    "last_name": "Morgan",
    "email": "jeremy-morgan@pluralsight.com",
    "ip_address": "127.0.0.1"
}
I will change it by sending a JSON object that looks like this:
{
    "first_name": "Jim",
    "last_name": "Lahey",
    "email": "jim-lahey@pluralsight.com",
    "ip_address": "169.254.20.101"
}
And the result looks like this:
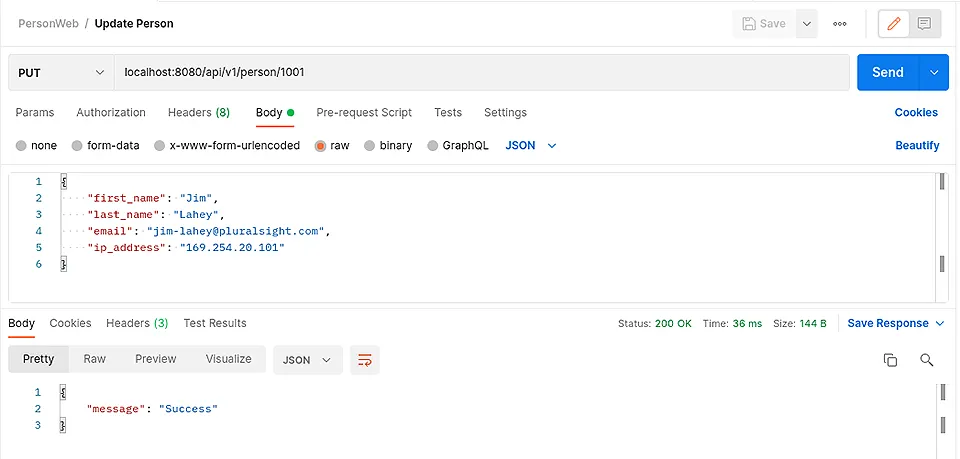
Awesome! We got our success message. Let’s make a quick GET request to see if it updated:
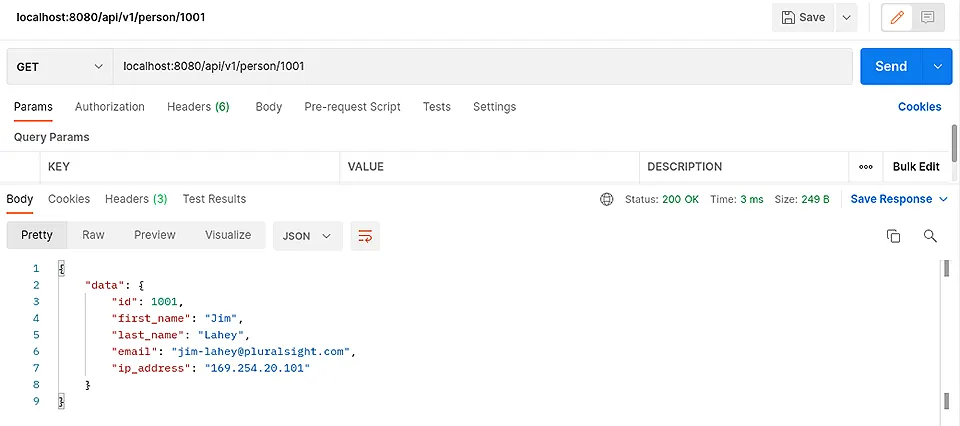
And it did! Partytimeexcellent. We can now add a record and update existing records.
In part five we will delete records, and send out options for our API. These will be the final steps in our tutorial.
Series: Building a Web App with Go and SQLite:
- Part 1. Create a Gin Web API Service
- Part 2. Connect to our Database
- Part 3. Selecting a Single Record
- Part 4. Inserting and Updating Records (this page)
- Part 5. Deleting Records and Sending Options
How much do you know about Go? Find out your Go SkillIQ here! Take a free skill assessment.