
Author: Jeremy Morgan
In this article, we’re going to create a serverless Blazor application! In two parts, we’re going to step by step and build an Azure Functions application that serves as an API and build a Blazor application to interface with it. This is a project I recently built on a live stream, and I want to share it with you here.
Part One: (This article) We’ll create an Azure Functions application to provide a Web API.
Part Two: We’ll create a Blazor application to interact with the API
What is serverless?
Yes, serverless is the hot new term right now, but what does it mean?
Let’s take a look.
Your traditional website architecture looks something like this:
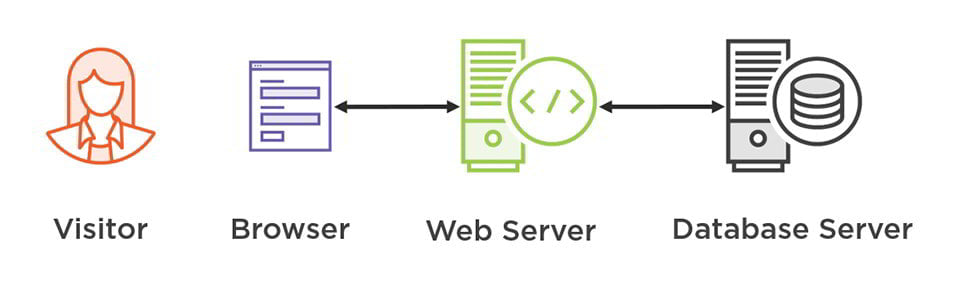
Your visitor loads up a browser that renders HTML produced by a web server. You send a request, and the server processes it and accesses a database. The data is then returned to the web server and rendered back to you.
This architecture works fine, and it’s served us for decades now. But developers are often moving to serverless architectures, and I’ll explain why.
Here’s what we’re going to set up:
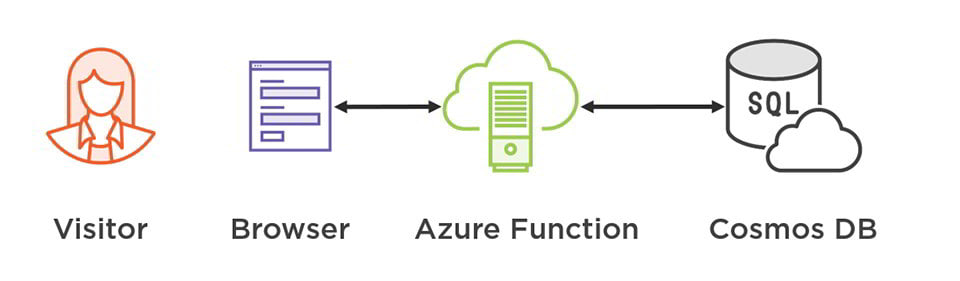
Instead of processing requests with a web server, our browser is talking to an Azure function with an in-memory database. Requests are sent from the browser to an Azure function that processes those requests, accesses the data, and sends them back.
You might be looking at this and thinking, “that doesn’t look much different.” The difference is now we’re working with minimal services in the cloud instead of big web servers and database servers.
Why Does This Matter?
First off, it’s a more straightforward process. The old process looks like this:

The client (web browser in this case) makes requests and responses to a server, which makes requests and responses to the database. It’s a long round trip through a couple of big servers.
These servers must be up and running all the time. Whether this is a small low traffic website or a busy one, you have servers provisioned.

With the Blazor serverless model, the client sends and receives data directly to a service. The client handles the rendering (using Blazor), making the webserver unnecessary. Since we don’t want to talk to a database directly from the browser we’ll use an Azure Function to handle that.
This means:
It’s faster: - Fewer round trips, rendering, and less complexity means better performance.
It’s easier: - You don’t have to set up and maintain servers for your website and database.
It’s cheaper: - Instead of paying for entire servers, you’re paying for services as you need them.
It’s scalable: - If traffic increases, you don’t have to provision servers. The service will scale up as needed.
So let’s get to creating our first serverless app with Blazor!
Getting Started
Here’s what we’re going to do. Imagine we’re having a potluck. We need an application to keep track of which food each person is bringing. They can enter in their name and what they’ll bring to the event.
What we need to know:
- Name of the food item (bread rolls)
- Person bringing the item
- Whether it’s Vegetarian
- Whether it’s glutenfree
So we’re going to create an API that gathers and stores this information. We’ll use a Blazor web application to act as a UI.
In this tutorial, we will:
- Create an in-memory database model to store the food items
- Create an Azure function app to act as a REST API
In part two of this tutorial, we will:
- Deploy the application to Azure
- Create a Blazor application to consume the API and provide a client
You will need:
- An Azure Account
- Visual Studio 2019
Let’s get started!
Creating an Azure Function app
First, we’ll create an Azure Function app. This will be our serverless application that handles requests to a pseudo database.
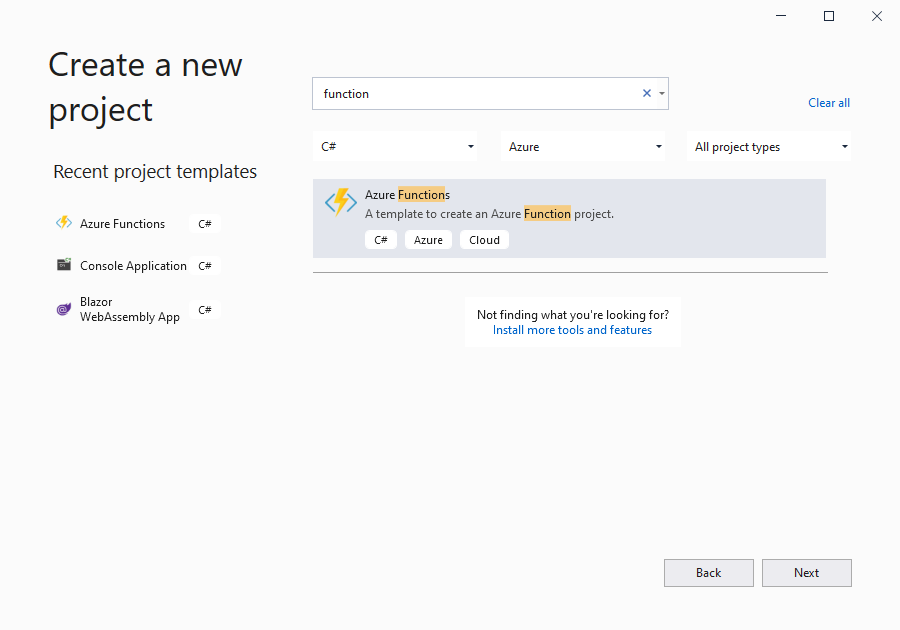
Open up Visual Studio and create a new project. For the type, we’ll search for “functions” and choose the Azure Function template:
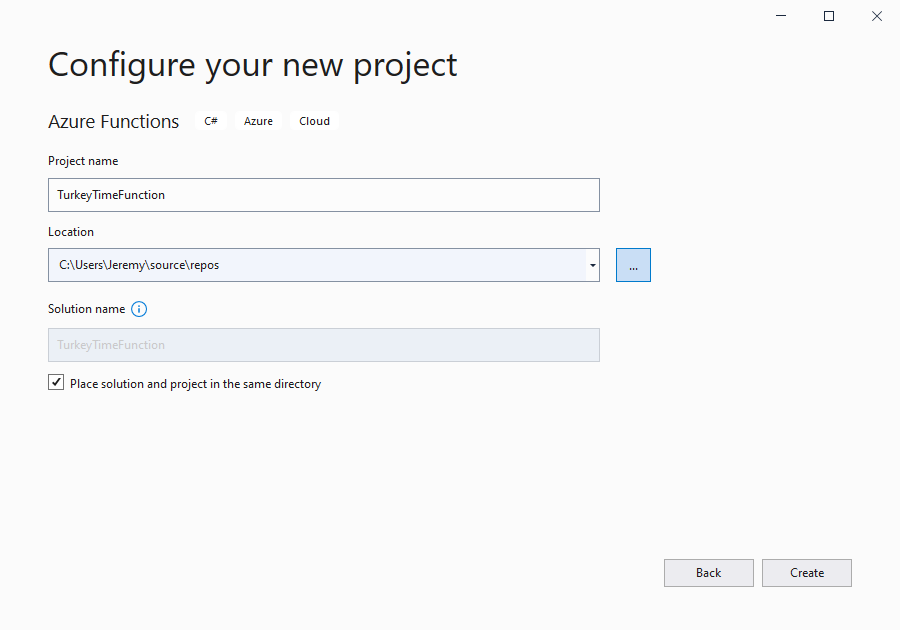
I’m going to name mine “TurkeyTimeFunction”
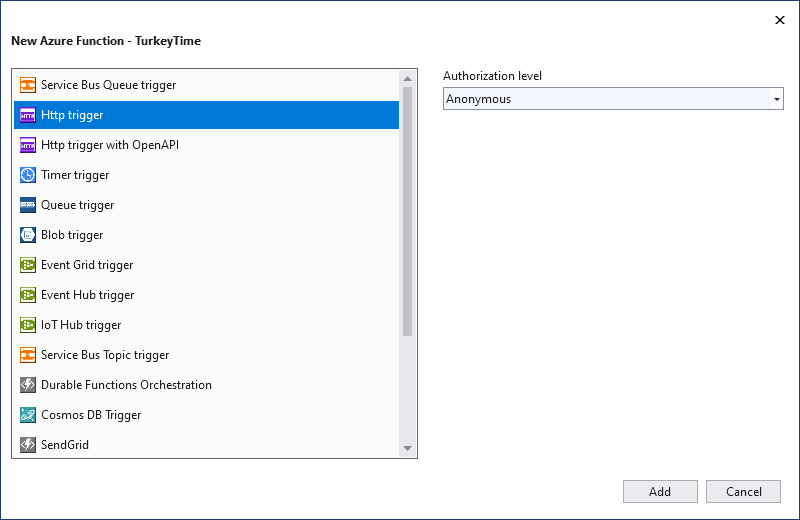
Next, you’ll see a list of options here. These are the different function types available. Select .NET 5, and Http trigger. This will create a function that’s driven by HTTP requests, similar to a REST API.
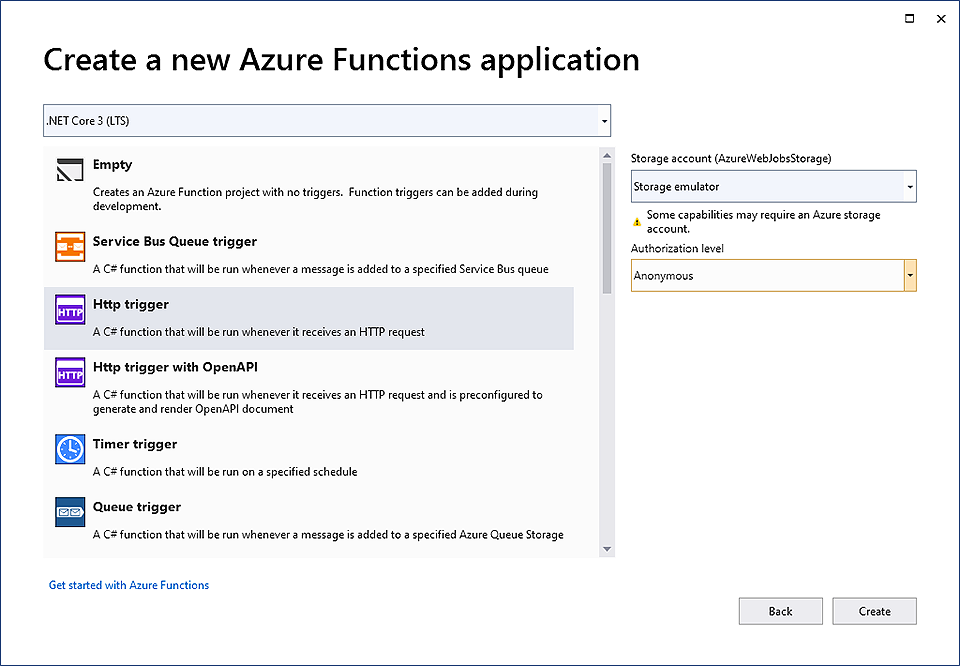
Make sure to set the Authorization level to “Anonymous.”
Create our model
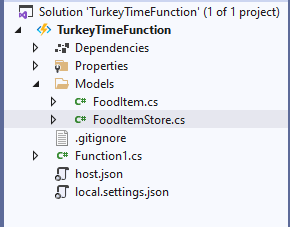
Next, we want to create a model for the food item in the database. Create a new folder named “Models” and add a class named FoodItem:
using System;
using Newtonsoft.Json;

namespace TurkeyTimeFunction.Models
{
    public class FoodItem
    {
        [JsonProperty(PropertyName = "id")]
        public string Id { get; set; } = Guid.NewGuid().ToString("n");
        [JsonProperty(PropertyName = "name")]
        public string Name { get; set; }
        [JsonProperty(PropertyName = "person")]
        public string Person { get; set; }
        [JsonProperty(PropertyName = "vegetarian")]
        public bool Vegetarian { get; set; }
        [JsonProperty(PropertyName = "glutenfree")]
        public bool Glutenfree { get; set; }
    }
}
This will be a model a specific food item we’ll bring. It contains the name of the item, the person bringing it, and whether it’s vegetarian or gluten-free.
Note: we’re adding code to auto-populate the ID with a GUID if it’s not specified.
public string Id { get; set; } = Guid.NewGuid().ToString("n");
This way it will generate a unique ID for our food items.
Then we’ll create a simple data store for the food item list. This will live in memory as long as the Azure function is running:
using System.Collections.Generic;

namespace TurkeyTimeFunction.Models
{
    public class FoodItemStore
    {
        public static List<FoodItem> fooditems = new List<FoodItem>();
    }
}
These two classes have been created so we can use this data in our application:
Great, now let’s create a new function to use it.
Creating a function to get all food items
Next, we’ll create a function to read the data. You can delete the Function1.cs that was created from the template.
Create a new class. I’m naming this “TurkeyTime.cs” to match the function name.
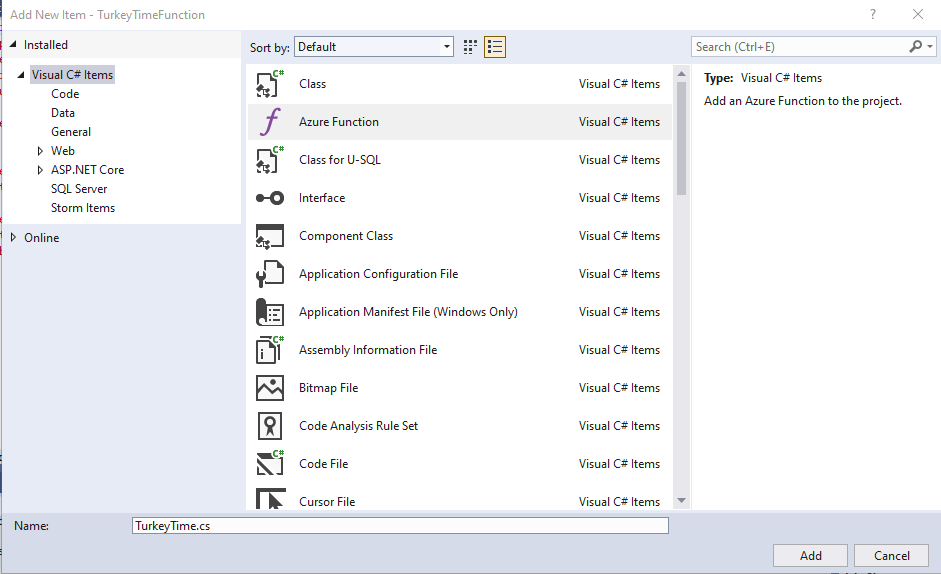
Delete the autogenerated function. We’re going to add a function that looks like this:
public static class TurkeyTime
    {
        [FunctionName("get_fooditems")]
        public static async Task<IActionResult> GetFoodItems(
            [HttpTrigger(AuthorizationLevel.Anonymous, "get", Route = "fooditem")] HttpRequest req,
            ILogger log)
        {
            log.LogInformation("Called get_fooditems with GET request");

            return new OkObjectResult(FoodItemStore.fooditems);
        }
    }
This function, named get_fooditems, will get a list of the food items. It will accept the HttpTrigger, that’s anonymously authorized and accepts GET requests to the route of /fooditem. It also takes in the HttpRequest, and an ILogger.
It will return the fooditems list we created above. Right now, it won’t return anything, as we haven’t added anything to the in-memory database yet:
When completed, this function will return all the food items stored in the database. Let’s create one to get a specific food item.
Creating a function to get a single food item
Next we’ll create a function that gets a single ID. Here’s the code:
[FunctionName("get_fooditems_byID")]
        public static async Task<IActionResult> GetFoodItemsById(
            [HttpTrigger(AuthorizationLevel.Anonymous, "get", Route = "fooditem/{id}")] HttpRequest req,
            ILogger log, string id)
        {
            log.LogInformation("Called get_fooditems_byID with GET request");

            var foodItem = FoodItemStore.fooditems.FirstOrDefault(f => f.Id.Equals(id));
            if (foodItem == null)
            {
                return new NotFoundResult();
            }

            return new OkObjectResult(foodItem);
        }
Like the last function, we’re passing in the HttpTrigger, but notice a critical difference. We’re still accepting a GET, but for the route, we have "fooditem/{id}". We’ll pass the ID of the food item in the URL and bind it to string id. Then we query the fooditems list and return a result. If fooditem is null, we’ll return a 404. If it’s not, we’ll return the fooditem.
This will return a single food item if needed.
Creating a function to add a food item
Next we want to add a food item. We’ll do this by accepting JSON in a POST request. So we’ll create a function that looks like this:
[FunctionName("add_fooditem")]
        public static async Task<IActionResult> AddFoodItem(
            [HttpTrigger(AuthorizationLevel.Anonymous, "post", Route = "fooditem")] HttpRequest req,
            ILogger log)
        {
            log.LogInformation("Called add_fooditem with POST request");

            string requestBody = await new StreamReader(req.Body).ReadToEndAsync();

            var fooditem = JsonConvert.DeserializeObject<FoodItem>(requestBody);

            FoodItemStore.fooditems.Add(fooditem);

            return new OkObjectResult(fooditem);
        }
This one is a little more complex. We’re passing in the trigger, but note it’s accepting a POST instead of a get. Then we pass in the HttpRequest.
We need to read the body of the POST, which we know will be JSON. We’ll create a StreamReader to read that:
string requestBody = await new StreamReader(req.Body).ReadToEndAsync();
Then we’ll deserialize that JSON into a FoodItem object:
var input = JsonConvert.DeserializeObject<FoodItem>(requestBody);
And then add it to our list:
FoodItemStore.fooditems.Add(fooditem);
Now we can return the newly created fooditem as a result to show it was created:
return new OkObjectResult(fooditem);
This function will add new food items to the in-memory database.
Creating a function to delete food items
Now we need something that will delete food items.
[FunctionName("delete_fooditem")]
       public static async Task<IActionResult> DeleteFoodItem(
           [HttpTrigger(AuthorizationLevel.Anonymous, "delete", Route = "fooditem/{id}")] HttpRequest req,
           ILogger log, string id)
       {
           log.LogInformation("Called delete_fooditem with DELETE request.");

           var fooditem = FoodItemStore.fooditems.FirstOrDefault(f => f.Id.Equals(id));

           if (fooditem == null)
           {
               return new NotFoundResult();
           }

           FoodItemStore.fooditems.Remove(fooditem);
           return new OkResult();
       }
In this method, we pass in an HttpTrigger like before, except we’re now specifying a DELETE command, and once again, we’re specifying a route with the ID appended to it. Then we’re passing a string id into the method.
We’re using Linq to search for a food item that matches the ID we passed in.
var fooditem = FoodItemStore.fooditems.FirstOrDefault(f => f.Id.Equals(id));
If the result is no, we’ll throw a 404. Otherwise, we’ll remove this food item from the list. Then we return an OK result.
This function is almost ready to deploy. We need to make a simple change to the localsettings.json file so we can test requests to it:
add the following to your localsettings.json:
 "Host": {
    "CORS": "*"
  }
And now we can run the function.
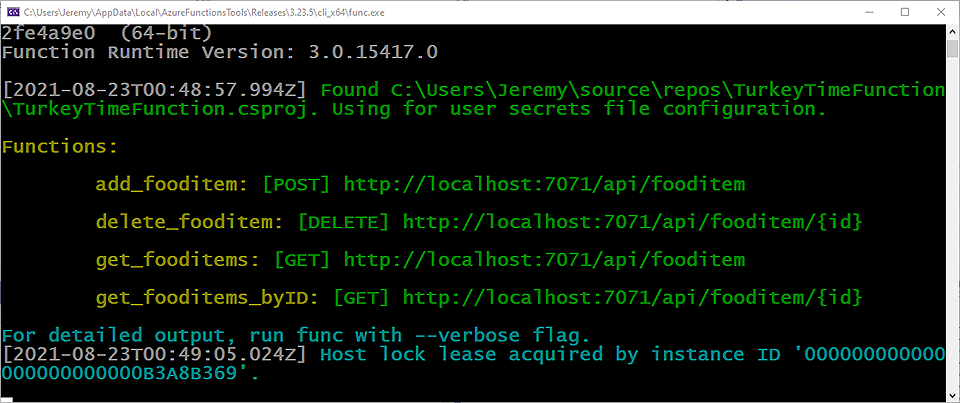
Testing the Azure Functions app locally
Press F5 to run the application locally, and you’ll see a console window that looks like this:
Now we can send some commands to test this application. We’ll use Postman for this.
Step one: adding a food item
Load up Postman and create a new POST request that looks like this:
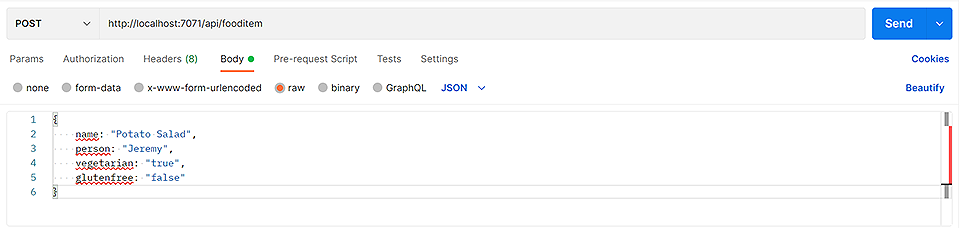
Make sure it’s set to POST and set the body to raw with a data type of JSON.
Inside the body, add some JSON that matches our FoodItem type:
{
    name: "Potato Salad",
    person: "Jeremy",
    vegetarian: "true",
    glutenfree: "false"
}
Send the request, and you’ll see the object returned, with its new ID that’s automatically assigned:

Perfect! We’ll use that ID in the future.
Step two: retrieve that food item
Next, send a GET request to the base URL with the ID appended to the URL. This will retrieve that exact URL.
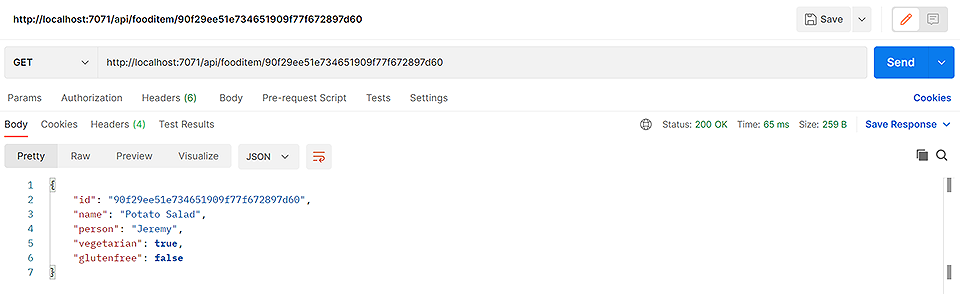
Pretty neat. It’s fast and easy.
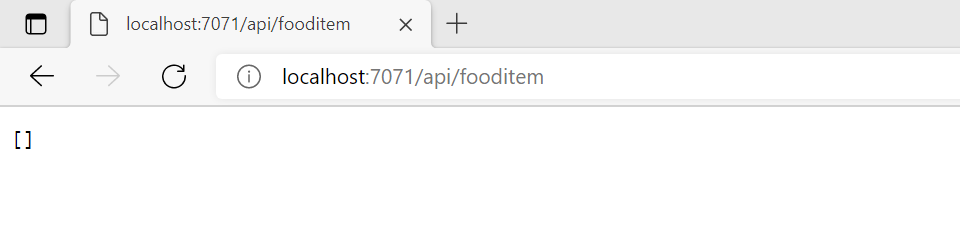
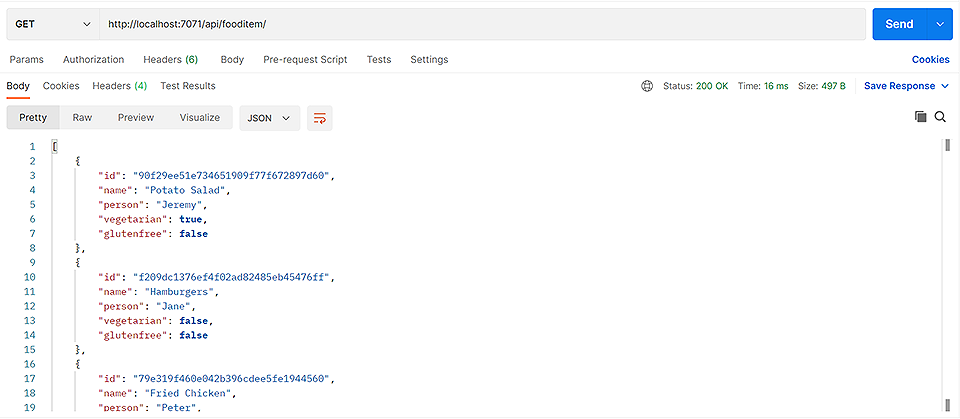
Step three: get all food items
You can add more food items (step one) and then retrieve them all by sending a simple GET request to the main URL:
Step four: delete a food item
So, Peter has decided he isn’t coming. Since I retrieved all the food items, I can see his id, so I add that to the end of the URL and send a DELETE command:

It’s no longer in our list:

And it’s that easy!
Conclusion
In this tutorial, we created an Azure functions application that acts as a REST API. It manages our food items, and we can add, list, or delete food items from the database.
Azure functions are lean, efficient applications that do small tasks like this very well. In part two of this tutorial, we’ll deploy it to Azure and connect a Blazor application to it, with a full GUI to manage our food items and make our application work!
You can watch me build this on my live stream to see how it all works.
Stay tuned!
You can learn more about Azure Functions with the following courses: