
Author: Jeremy Morgan
Part Four:
For the last part of this tutorial, the CRUD methods. We’re going to fully impement backend and frontend functionality here, so let’s get started.
Part of a series:
Part One
- Set up a new Blazor project
- Create a SQLite database
Part Two
- Create a database model
- Create a database context
- Connect to the SQLite Database
Part Three
- Add services
- Create the initial migration
- Seed the database
Part Four (This page)
9. The CRUD operations
Now comes the fun part. We will connect to our database and create, read, update, and delete items, in our case, employees of the organization.
Create
To create a new Employee, we’ll need to take input from the web browser, turn it into an Employee class object, then pass it to Entity Framework to store it in the database.
First, let’s create a form to add a new person. We will put all of our code in the index page of this application.
Right now, it contains the following code:
@page "/"

<PageTitle>Index</PageTitle>

<h1>Hello, world!</h1>

Welcome to your new app.

<SurveyPrompt Title="How is Blazor working for you?" />
We’re going to delete the last three lines of this application. We don’t need them. So your index.razor in Pages should look like this:
@page "/"

<PageTitle>Our Employees</PageTitle>
Great! Now we’re going to create a form to add a new Employee to our Database.
Index.razor.cs
First, let’s create a code behind file for our page.
In Pages, go to Add, then New Item:
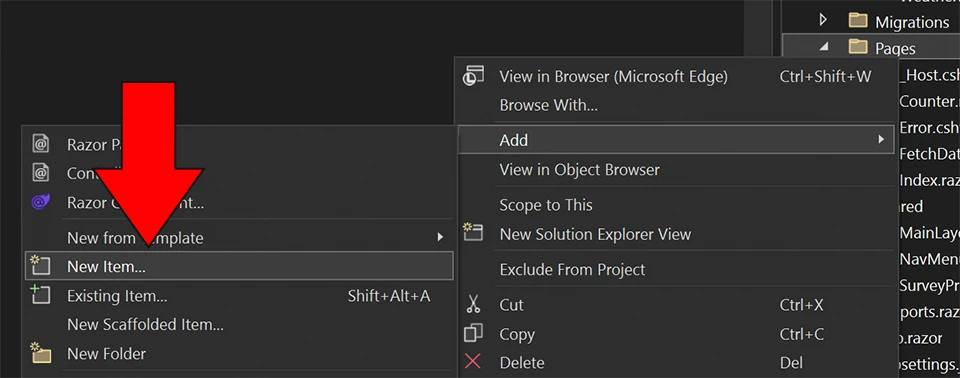
Create a new class, and name it Index.razor.cs.
You will see this creates a code behind file for our Index page.

Change the class to a partial class so it looks like this:
namespace Employees.Pages
{
    public partial class Index
    {
    }
}
This will allow us to add code here, and it’s more readable and organized when we keep it separate from the presentation (Razor) portion in Index.razor.
Here, let’s create a boolean switch to show our create form:
public bool ShowCreate { get; set; }
This sets a switch to show the form on the page. We only want to show the form if we are ready to use it. This will show and hide the form as we see fit.
We will hide the create page when we load up the page the first time. To do that, we’ll set ShowCreate to false when the page is loaded. We do that with the OnInitializedAsync() method :
protected override async Task OnInitializedAsync()
{
    ShowCreate = false;
}
Next, we’ll add our Data Context that we created earlier.
private EmployeeDataContext? _context;
We’re making it nullable if it doesn’t work as expected, but don’t worry. We’ll check for that later.
Now, let’s add an Employee object that will hold data from our form. The Employee object will store form values. We’ll then submit that object to Entity Framework.
public Employee? NewEmployee { get; set; }
Next, we want to create a method to show our creation form. It’s hidden when the page loads up, but if the user presses the Add a New Employee button, we want to show that form.
public void ShowCreateForm()
{
    NewEmployee = new Employee();
    ShowCreate = true;
}
Finally, we will create a method to create the employee object. This method is important because it will insert your new Customer object into the database.
We’re going to create a public async method that returns a Task:
public async Task CreateNewEmployee()
We then want to create our DbContext. Notice we’re awaiting it. It’s an asynchronous call.
_context ??= await EmployeeDataContextFactory.CreateDbContextAsync();
Since our context is nullable, we won’t take action if it’s null. So we’ll wrap our statements in an if so they only execute if we have a good DbContext:
if (NewEmployee is not null)
{
    _context?.Employees.Add(NewEmployee);
    _context?.SaveChangesAsync();
}
The full CreateNewEmployee() method looks like this:
public async Task CreateNewEmployee()
{
  _context ??= await EmployeeDataContextFactory.CreateDbContextAsync();

  if (NewEmployee is not null)
  {
    _context?.Employees.Add(NewEmployee);
    _context?.SaveChangesAsync();
  }
  ShowCreate = false;
}
This will be everything we need to:
- Create a new Employee object
- Gather details from the form (up next)
- Submit the new object with our form values
- Store it in the database.
Let’s jump back into the display portion of our component, Index.razor to fill out the display details.
Index.razor
This file will control the display elements of our component, what the user sees. When we last visited this file, it was just a page directive and a title:
@page "/"

<PageTitle>Our Employees</PageTitle>
Now we need to add some more functionality. First, we should include both Entity Framework Core and our Data folder, which is a namespace that contains the code we need to use:
@using Microsoft.EntityFrameworkCore
@using Employees.Data
Then we need to inject our Employee data context. We do that by using @inject:
@inject IDbContextFactory<EmployeeDataContext> EmployeeDataContextFactory;
Next, we’re going to draw a form. Earlier, you may have noticed that we had a ShowCreate flag that hides and shows our form. We will put the following code in if ShowCreate is set to TRUE:
@if (@ShowCreate)
{
}
Within that statement, we’ll add Razor code that binds to a NewEmployee object. This is the object we created in our code behind file.
<h3>Add a New Employee</h3>
   <div class="row">
       <label for="FirstName" class="col-4 col-form-label">First Name</label>
       <div class="col-8">
           <input id="FirstName" name="FirstName" type="text" class="form-control" @bind="@NewEmployee.FirstName">
       </div>
   </div>
   <div class="row">
       <label for="LastName" class="col-4 col-form-label">Last Name</label>
       <div class="col-8">
           <input id="LastName" name="LastName" type="text" class="form-control" @bind="@NewEmployee.LastName">
       </div>
   </div>
   <div class="row">
       <label for="Email" class="col-4 col-form-label">Email Address</label>
       <div class="col-8">
           <input id="Email" name="Email" type="text" class="form-control" @bind="@NewEmployee.Email">
       </div>
   </div>
   <div class="row">
       <label for="Department" class="col-4 col-form-label">Department</label>
       <div class="col-8">
           <input id="Department" name="Department" type="text" class="form-control" @bind="@NewEmployee.Department">
       </div>
   </div>
   <div class="form-group row">
       <label for="Avatar" class="col-4 col-form-label">Avatar</label>
       <div class="col-8">
           <input id="Avatar" name="Avatar" type="text" class="form-control" @bind="@NewEmployee.Avatar">
       </div>
   </div>
   <div class="form-group row">
       <div class="offset-4 col-8">
           <button name="submit" type="submit" class="btn btn-primary" @onclick="CreateNewEmployee">Submit</button>
       </div>
   </div>
You’ll notice that we use the @bind directive to bind the values to our object. And in the submit button, we use an @onclick directive to call our CreateNewEmployee method we created earlier:
<button name="submit" type="submit" class="btn btn-primary" @onclick="CreateNewEmployee">Submit</button>
This means our form will gather data from the user, assign it to a NewEmployee object, then pass this to CreateNewEmployee and insert it into the database. There is little code involved here.
Here is what the final file will look like:
@page "/"
@using Microsoft.EntityFrameworkCore
@using Employees.Data

<PageTitle>Our Employees</PageTitle>

@inject IDbContextFactory<EmployeeDataContext> EmployeeDataContextFactory;

@if (@ShowCreate)
{

    <h3>Add a New Employee</h3>
    <div class="row">
        <label for="FirstName" class="col-4 col-form-label">First Name</label>
        <div class="col-8">
            <input id="FirstName" name="FirstName" type="text" class="form-control" @bind="@NewEmployee.FirstName">
        </div>
    </div>
    <div class="row">
        <label for="LastName" class="col-4 col-form-label">Last Name</label>
        <div class="col-8">
            <input id="LastName" name="LastName" type="text" class="form-control" @bind="@NewEmployee.LastName">
        </div>
    </div>
    <div class="row">
        <label for="Email" class="col-4 col-form-label">Email Address</label>
        <div class="col-8">
            <input id="Email" name="Email" type="text" class="form-control" @bind="@NewEmployee.Email">
        </div>
    </div>
    <div class="row">
        <label for="Department" class="col-4 col-form-label">Department</label>
        <div class="col-8">
            <input id="Department" name="Department" type="text" class="form-control" @bind="@NewEmployee.Department">
        </div>
    </div>
    <div class="form-group row">
        <label for="Avatar" class="col-4 col-form-label">Avatar</label>
        <div class="col-8">
            <input id="Avatar" name="Avatar" type="text" class="form-control" @bind="@NewEmployee.Avatar">
        </div>
    </div>
    <div class="form-group row">
        <div class="offset-4 col-8">
            <button name="submit" type="submit" class="btn btn-primary" @onclick="CreateNewEmployee">Submit</button>
        </div>
    </div>

}
else
{
    <div class="form-group row">
        <div class="offset-4 col-8">
            <button name="submit" type="submit" class="btn btn-primary" @onclick="ShowCreateForm">Add a New Employee</button>
        </div>
    </div>

    <p>SHOW THE LIST</p>
}
Right now, if ShowCreate is false, we simply add a button to show our form. Where it says SHOW THE LIST we will add functionality in the next step of our tutorial to display a list of employees.
But for now, our component is complete.
If we run the file and click “Add a New Employee,” we can put in some test data:
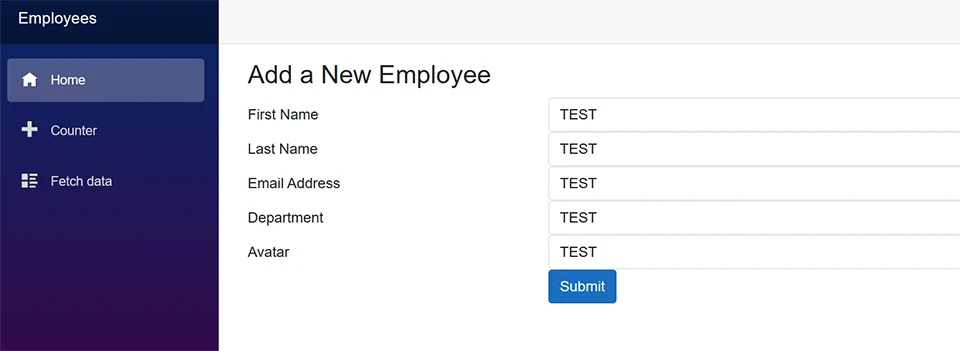
And once we submit it, the data is inserted into our SQLite database!
Awesome, we can create new records. Now, let’s show the records already in the database, part of our application’s Read portion.
Read
Reading is the 2nd part of CRUD. We have to be able to read records. We want to see what’s in our database. For this application, we want to see the records in the database now, a list of our employees. Here’s how we’re going to do it. We’ll build a method to run a query, create a C# list , and store a list of Employee objects. Once again, we’re using the Index.razor and Index.razor.cs files. Let’s start with the backend.
Index.razor.cs
First we need to add our list of Employee objects. We’ll make this a public nullable list:
public List<Employee>? OurEmployees { get; set; }
We’ll take our employees from the database, populate this list, and use it to display the list of employees on our page.
Let’s create a method to extract the employee list:
public async Task ShowEmployees()
 {
     _context ??= await EmployeeDataContextFactory.CreateDbContextAsync();

     if (_context is not null)
     {
         OurEmployees = await _context.Employees.ToListAsync();
     }

     if (_context is not null) await _context.DisposeAsync();
 }
This is primitive, but it gets the job done. We await the connection to create our DbContext, as we have in the past. We want to open and close this context each time we use it, even for read operations.
We make the connection. If the context isn’t null, we make a call to it to give us a List of Employees from the database. We’re just doing a basic call here, but you can attach queries and do other things with it. For now we want it to just dump all employees in the table into our temporary list.
Let’s display it on the page for the user.
Index.razor
On our index page, we have the text:
<p>SHOW THE LIST</p>
Delete this. In its place, we want to display items if we have any Employee objects in our list.
To do that, we’ll use simple Razor syntax. We want to specify that if our list is not null and it has any items in it, we’ll display something:
@if (@OurEmployees is not null && @OurEmployees.Count > 0)
{
  // display
}
Within this switch, we’ll create an HTML table. However, this table will be slightly different from static HTML because we will make it dynamic with Razor.
To start, we need to define the table and its headings. This will only be displayed one time before the data is displayed.
We’ll create a heading for each field in our data row and add a space for edit and delete buttons.
<div class="table-responsive">
            <table class="table table-striped table-hover table-bordered table-light border-dark">
                <thead>
                    <tr>
                        <th scope="col">ID</th>
                        <th scope="col">First Name</th>
                        <th scope="col">Last Name</th>
                        <th scope="col">Email</th>
                        <th scope="col">Department</th>
                        <th scope="col">Picture</th>
                        <th scope="col">Edit</th>
                        <th scope="col">Delete</th>
                    </tr>
                </thead>
            <tbody>
Next, we’ll add in the “loop” that will iterate through our records and display a row for our table for each record.
We’ll once again use Razor for this:
@foreach (var employee in @OurEmployees)
{
  // display
}
The foreach function will iterate through every record in OurEmployees and within the curly braces, we’ll have the code that will repeat every time we find a new record. Inside each table cell, we’ll bind a value from each Employee object.
<tr>
  <th scope="row">@employee.Id</th>
  <td>@employee.FirstName</td>
  <td>@employee.LastName</td>
  <td>@employee.Email</td>
  <td>@employee.Department</td>
  <td><img src="@employee.Avatar" width="50" height="50" /></td>
  <td></td>
  <td></td>
</tr>
Notice that we’re binding each variable as text, except the avatar. We display that as an image:
<td><img src="@employee.Avatar" width="50" height="50" /></td>
Then we’re leaving two blank cells for our edit and delete functions.
Finally, we need to close out our table. We’ll put this outside the last curly braces. This will only display one time.
</tbody>
</table>
</div>
The final product will look like this:
@if (@OurEmployees is not null && @OurEmployees.Count > 0)
  {
      <div class="table-responsive">
          <table class="table table-striped table-hover table-bordered table-light border-dark">
              <thead>
                  <tr>
                      <th scope="col">ID</th>
                      <th scope="col">First Name</th>
                      <th scope="col">Last Name</th>
                      <th scope="col">Email</th>
                      <th scope="col">Department</th>
                      <th scope="col">Picture</th>
                      <th scope="col">Edit</th>
                      <th scope="col">Delete</th>
                  </tr>
              </thead>
          <tbody>

          @foreach (var employee in @OurEmployees)
          {

              <tr>
                  <th scope="row">@employee.Id</th>
                  <td>@employee.FirstName</td>
                  <td>@employee.LastName</td>
                  <td>@employee.Email</td>
                  <td>@employee.Department</td>
                  <td><img src="@employee.Avatar" width="50" height="50" /></td>
              </tr>
          }

              </tbody>
          </table>
      </div>
  }
That looks good, so let’s run it!
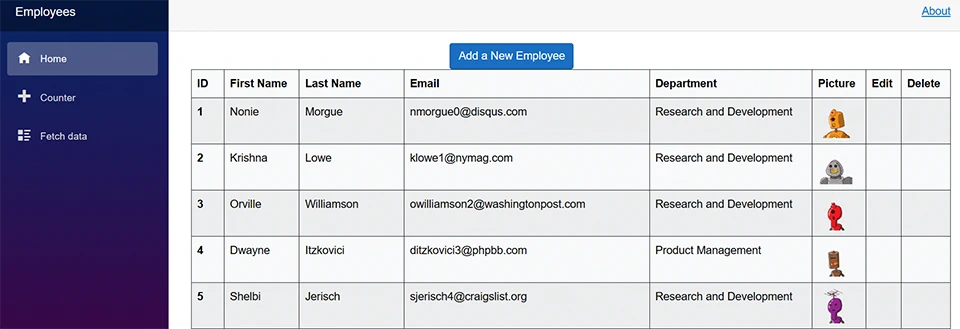
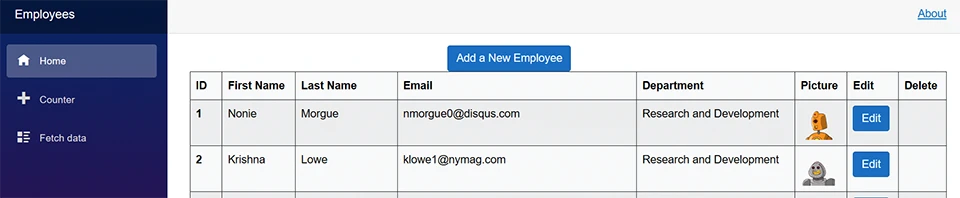
And now we have a table! It displays everyone in our Employee database from the first to the last.
Now let’s find out how to change those records!
Update
For the update portion, we’re going to edit our records. Generally, Blazor tutorials tell you to build another page for this, but we’ll put our edit functionality right within the component. Once again, we will be doing some showing and hiding with Razor.
Index.razor.cs
Open up our Index.razor.cs code behind file. Towards the top of the class, we’ll put in a flag. This will show and hide our edit fields on the form.
At the top of class we have a flag for ShowCreate so let’s put this flag right below it:
public bool ShowCreate { get; set; }
public bool EditRecord { get; set; }
Then we want to create a temporary property of the ID we want to edit. So we’ll call that EditingId. This is the Id of the record we’re editing, so we can focus on just editing one record at a time. We’ll use this flag to control our edit form and limit it to that single record.
We will also create a new Employee, but it will contain the data from the employee we want to edit:
public Employee? EmployeeToUpdate { get; set; }
This is a temporary property used to hold that record.
Then we’ll create a method to show our edit form. It will load up the data from the record we want to edit and display an edit form for that record with the data within it. We’ll pass in the employee record we want to update.
public async Task ShowEditForm(Employee ourEmployee)
{
}
Within this form, we’ll load up the context:
_context ??= await EmployeeDataContextFactory.CreateDbContextAsync();
Then, we pull the record of the Employee record to update and store it in EmployeeToUpdate
EmployeeToUpdate = _context.Employees.FirstOrDefault(x => x.Id == ourID);
Then, we’ll set a couple of flags so the edit form opens up, and is populated with our data:
EditingId = ourEmployee.Id;
EditRecord = true;
The full method will look like this:
public async Task ShowEditForm(Employee ourEmployee)
 {
   _context ??= await EmployeeDataContextFactory.CreateDbContextAsync();
   EmployeeToUpdate = _context.Employees.FirstOrDefault(x => x.Id == ourEmployee.Id);
   EditingId = ourEmployee.Id;
   EditRecord = true;
 }
This sets our editing ID and the record we want to edit.
Finally, we’ll create the method to update the record, and this method will do the work of utilizing Entity Framework Core to update our SQLite database.
We’ll create a new async method:
public async Task UpdateEmployee()
{
}
Inside the curly braces, we need to set EditRecord to false so the form goes away:
EditRecord = false;
Then we’ll load up the context as we have before:
_context ??= await EmployeeDataContextFactory.CreateDbContextAsync();
Then we’ll make sure the context is loaded (not null):
if (_context is not null)
{
}
Now, we want to grab the EmployeeToUpdate object, which is bound to our form and contains new information (or at least it should).
We’ll call the Update method to insert our employee to update
if (EmployeeToUpdate is not null) _context.Employees.Update(EmployeeToUpdate);
Then we’ll save the changes and dispose our context:
await _context.SaveChangesAsync();
await _context.DisposeAsync();
The complete method should look like this:
public async Task UpdateEmployee()
{
    EditRecord = false;
    _context ??= await EmployeeDataContextFactory.CreateDbContextAsync();

    if (_context is not null)
    {
        if (EmployeeToUpdate is not null) _context.Employees.Update(EmployeeToUpdate);
        await _context.SaveChangesAsync();
    }
}
Great! Now let’s build our edit form.
Index.razor
Open our Index.razor file, and we will add the functionality in Razor to build this edit form.
In the section where we grab our records, let’s make a change.
Under
@foreach (var employee in @OurEmployees)
{
Let’s wrap our table row like this:
@if (!@EditRecord)
{
  <tr>
    <th scope="row">@employee.Id</th>
    <td>@employee.FirstName</td>
    <td>@employee.LastName</td>
    <td>@employee.Email</td>
    <td>@employee.Department</td>
    <td><img src="@employee.Avatar" width="50" height="50"/></td>
    <td></td>
    <td></td>
    </tr>
}
Then in our edit field, let’s add a button to edit our record:
<button name="submit" type="submit" class="btn btn-primary" @onclick="() => ShowEditForm(employee)">Edit</button>
Let’s look at this closer to see how we’re using Razor to call our method.
We’re once again using @onclick to call a C# method (ShowEditForm) when the button is clicked. Then we pass in our Employee object to that method, which is the employee object we’re editing.
So when that button is clicked, we know we have to draw an edit form for that row. So let’s add another if statement that draws an edit form instead of displaying the data.
After the closing bracket of our if statement:
@if (!@EditRecord)
{
// code
}
we need to add an else:
else
{

}
And within these brackets, we will check if EmployeeToUpdate is null, and if EmployeeToUpdate.Id is the same as the @employee.id in the loop. That way, we can draw an edit form instead of a display form.
if (@EmployeeToUpdate is not null && @EmployeeToUpdate.Id == @employee.Id)
{
}
Within these curly braces, we’ll add our edit form:
<tr>
  <th scope="row">@employee.Id</th>
    <td><input id="FirstName" name="FirstName" type="text" class="form-control" @bind="@EmployeeToUpdate.FirstName" /></td>
    <td><input id="LastName" name="LastName" type="text" class="form-control" @bind="@EmployeeToUpdate.LastName" /></td>
    <td><input id="Email" name="Email" type="text" class="form-control" @bind="@EmployeeToUpdate.Email" /></td>
    <td><input id="Department" name="Department" type="text" class="form-control" @bind="@EmployeeToUpdate.Department" /></td>
    <td> <input id="Avatar" name="Avatar" type="text" class="form-control" @bind="@EmployeeToUpdate.Avatar" /></td>
    <td> <button name="submit" type="submit" class="btn btn-primary" @onclick="@UpdateEmployee">Save</button></td>
    <td></td>
</tr>
Then, we’ll add an else. This else will display a standard row. Yes, we’re duplicating code here, but it will make the editing process a bit more smooth:
else
{
    <tr>
      <th scope="row">@employee.Id</th>
      <td>@employee.FirstName</td>
      <td>@employee.LastName</td>
      <td>@employee.Email</td>
      <td>@employee.Department</td>
      <td><img src="@employee.Avatar" width="50" height="50"/></td>
      <td> <button name="submit" type="submit" class="btn btn-primary" @onclick="() => ShowEditForm(employee)">Edit</button></td>
      <td></td>
      </tr>
}
Here is what the final statement will look like:
@foreach (var employee in @OurEmployees)
{
  @if (!@EditRecord)
  {
  <tr>
    <th scope="row">@employee.Id</th>
    <td>@employee.FirstName</td>
    <td>@employee.LastName</td>
    <td>@employee.Email</td>
    <td>@employee.Department</td>
    <td><img src="@employee.Avatar" width="50" height="50"/></td>
    <td> <button name="submit" type="submit" class="btn btn-primary" @onclick="() => ShowEditForm(employee)">Edit</button></td>
    <td></td>
  </tr>
  }
  else
  {
    if (@EmployeeToUpdate is not null && @EmployeeToUpdate.Id == @employee.Id)
    {
    <tr>
      <th scope="row">@employee.Id</th>
      <td><input id="FirstName" name="FirstName" type="text" class="form-control" @bind="@EmployeeToUpdate.FirstName" /></td>
      <td><input id="LastName" name="LastName" type="text" class="form-control" @bind="@EmployeeToUpdate.LastName" /></td>
      <td><input id="Email" name="Email" type="text" class="form-control" @bind="@EmployeeToUpdate.Email" /></td>
      <td><input id="Department" name="Department" type="text" class="form-control" @bind="@EmployeeToUpdate.Department" /></td>
      <td> <input id="Avatar" name="Avatar" type="text" class="form-control" @bind="@EmployeeToUpdate.Avatar" /></td>
      <td> <button name="submit" type="submit" class="btn btn-primary" @onclick="@UpdateEmployee">Save</button></td>
      <td></td>
    </tr>
    }
    else
    {
      <tr>
        <th scope="row">@employee.Id</th>
        <td>@employee.FirstName</td>
        <td>@employee.LastName</td>
        <td>@employee.Email</td>
        <td>@employee.Department</td>
        <td><img src="@employee.Avatar" width="50" height="50"/></td>
        <td> <button name="submit" type="submit" class="btn btn-primary" @onclick="() => ShowEditForm(employee)">Edit</button></td>
        <td></td>
      </tr>
    }
  }
}
Now, we’re ready to run it and try it out. Press F5 to run it:
We can see the row of records. Let’s edit this first field.
Click the edit button.
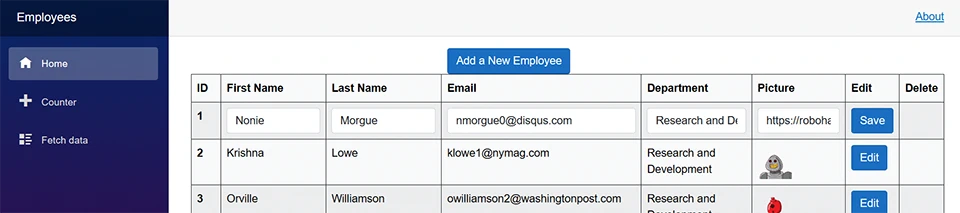
And now we can see our edit form instead of the record!

We will change the first name and click save.
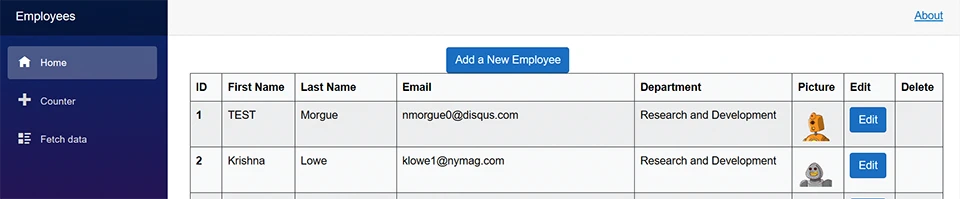
And it’s done! We can now edit records and update them!
Now let’s see how we can delete records and complete our CRUD functionality.
Delete
Now we need to be able to remove records when we need to. This is fairly simple. We’re just going to build a simple delete method without confirmation.
Index.razor.cs
Open up Index.razor.cs.
We will add a method (aptly named) DeleteEmployee. It’s an async method that’s going to take an ‘Employee’ object from the form and remove it from our database:
public async Task DeleteEmployee(Employee ourEmployee)
{

}
Within the curly braces, we’ll once again create our Context:
_context ??= await EmployeeDataContextFactory.CreateDbContextAsync();
Then, if the context isn’t null:
if (_context is not null)
{
}
We will check if ourEmployee isn’t null. If it’s not, we’ll pass it to our context and call Remove:
if (ourEmployee is not null) _context.Employees.Remove(ourEmployee);
And this will remove it from our context. Then we’ll save our changes:
await _context.SaveChangesAsync();
We need to redraw the screen. We can do that by calling ShowEmployees again:
await ShowEmployees();
The complete method will look like this:
public async Task DeleteEmployee(Employee ourEmployee)
{
  _context ??= await EmployeeDataContextFactory.CreateDbContextAsync();

 if (_context is not null)
 {
    if (ourEmployee is not null) _context.Employees.Remove(ourEmployee);
    await _context.SaveChangesAsync();
 }
 await ShowEmployees();
}
This code will remove the record from our database. Now let’s build a button in the form to do this:
Index.razor
Open up Index.razor and in the last empty TDs in our forms:
<td></td>
We’ll add in this button:
<button name="submit" type="submit" class="btn btn-primary" @onclick="() => DeleteEmployee(employee)">Delete</button>
Remember, we have to add it twice in our forms because the display row code exists twice.
The entire table will look like this:
<div class="table-responsive">
    <table class="table table-striped table-hover table-bordered table-light border-dark">
        <thead>
        <tr>
            <th scope="col">ID</th>
            <th scope="col">First Name</th>
            <th scope="col">Last Name</th>
            <th scope="col">Email</th>
            <th scope="col">Department</th>
            <th scope="col">Picture</th>
            <th scope="col">Edit</th>
            <th scope="col">Delete</th>
        </tr>
        </thead>
        <tbody>

        @foreach (var employee in @OurEmployees)
        {
            @if (!@EditRecord)
            {
                <tr>
                    <th scope="row">@employee.Id</th>
                    <td>@employee.FirstName</td>
                    <td>@employee.LastName</td>
                    <td>@employee.Email</td>
                    <td>@employee.Department</td>
                    <td><img src="@employee.Avatar" width="50" height="50"/></td>
                        <td> <button name="submit" type="submit" class="btn btn-primary" @onclick="() => ShowEditForm(employee)">Edit</button></td>
                        <td><button name="submit" type="submit" class="btn btn-primary" @onclick="() => DeleteEmployee(employee)">Delete</button></td>
                </tr>
            }
            else
            {
                if (@EmployeeToUpdate is not null && @EmployeeToUpdate.Id == @employee.Id)
                {
                    <tr>
                        <th scope="row">@employee.Id</th>
                        <td><input id="FirstName" name="FirstName" type="text" class="form-control" @bind="@EmployeeToUpdate.FirstName" /></td>
                            <td><input id="LastName" name="LastName" type="text" class="form-control" @bind="@EmployeeToUpdate.LastName" /></td>
                            <td><input id="Email" name="Email" type="text" class="form-control" @bind="@EmployeeToUpdate.Email" /></td>
                            <td><input id="Department" name="Department" type="text" class="form-control" @bind="@EmployeeToUpdate.Department" /></td>
                            <td> <input id="Avatar" name="Avatar" type="text" class="form-control" @bind="@EmployeeToUpdate.Avatar" /></td>
                        <td> <button name="submit" type="submit" class="btn btn-primary" @onclick="@UpdateEmployee">Save</button></td>
                            <td></td>
                    </tr>
                }
                else
                {
                    <tr>
                        <th scope="row">@employee.Id</th>
                        <td>@employee.FirstName</td>
                        <td>@employee.LastName</td>
                        <td>@employee.Email</td>
                        <td>@employee.Department</td>
                        <td><img src="@employee.Avatar" width="50" height="50"/></td>
                        <td> <button name="submit" type="submit" class="btn btn-primary" @onclick="() => ShowEditForm(employee)">Edit</button></td>
                            <td><button name="submit" type="submit" class="btn btn-primary" @onclick="() => DeleteEmployee(employee)">Delete</button></td>
                    </tr>
                }
            }
        }

        </tbody>
    </table>
</div>
Now we’re ready to try out our Delete button.
Press F5 to run it:
And let’s delete record 2:
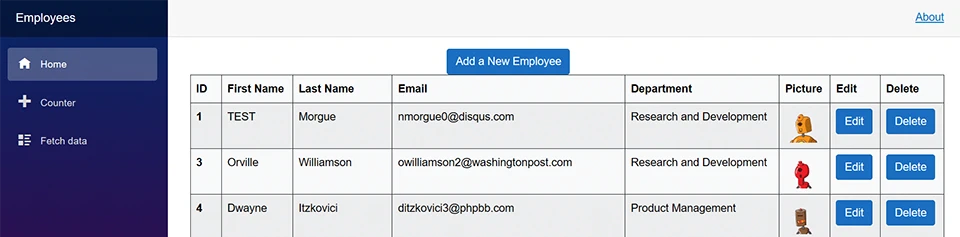
And it’s gone!
You can now delete records!
10. Summary
This was a bit of a long tutorial, but there isn’t a lot of information for a complete end-to-end solution like this. I love the combination of Blazor, EF Core, and SQLite for building small but very functional applications. With this in your toolbelt you can quickly whip up data driven applications to solve tons of problems.
If you have any questions or comments, feel free to reach out to me.
If you want to learn more about any of these topics, we have tons of great resources here:
Thanks for reading!