
Author: Jeremy Morgan
Part Three:
In part two we created a database model and created a context for it. We also connected our application to the SQLite database. Now we’re going to put that database to work. Let’s get started with adding services.
Part of a series:
Part One (This page)
- Set up a new Blazor project
- Create a SQLite database
Part Two
- Create a database model
- Create a database context
- Connect to the SQLite Database
Part Three (This page)
Part Four
- Build the CRUD operations
- Create
- Read
- Update
- Delete
- Summary
6. Adding the Services
We need to add the context we’ve created as a service to our application. Open up Program.cs, the main class for our Blazor application.
Add the following using statements to the top of the file:
using Employees.Data;
using Microsoft.EntityFrameworkCore;
using Microsoft.Extensions.Configuration;
This will bring in everything we need to build our database context.
Then we need to pull in our connection string:
var connectionString = builder.Configuration.GetConnectionString("EmployeeDB");
Then we’ll add the service. After:
builder.Services.AddServerSideBlazor();
add the following line:
builder.Services.AddDbContextFactory<EmployeeDataContext>(options => options.UseSqlite(connectionString));
This will create our DBContext and make it available for our applications. The service will start and be available whenever we need it.
My full Program.cs looks like this:
using Employees.Data;
using Microsoft.EntityFrameworkCore;
using Microsoft.Extensions.Configuration;

var builder = WebApplication.CreateBuilder(args);
var connectionString = builder.Configuration.GetConnectionString("EmployeeDB");

// Add services to the container.
builder.Services.AddRazorPages();
builder.Services.AddServerSideBlazor();
builder.Services.AddDbContextFactory<EmployeeDataContext>(options => options.UseSqlite(connectionString));
builder.Services.AddSingleton<WeatherForecastService>();

var app = builder.Build();

// Configure the HTTP request pipeline.
if (!app.Environment.IsDevelopment())
{
    app.UseExceptionHandler("/Error");
    // The default HSTS value is 30 days. You may want to change this for production scenarios, see https://aka.ms/aspnetcore-hsts.
    app.UseHsts();
}

app.UseHttpsRedirection();

app.UseStaticFiles();

app.UseRouting();

app.MapBlazorHub();
app.MapFallbackToPage("/_Host");

app.Run();
Now we’re ready to create our database.
7. Creating the initial migration
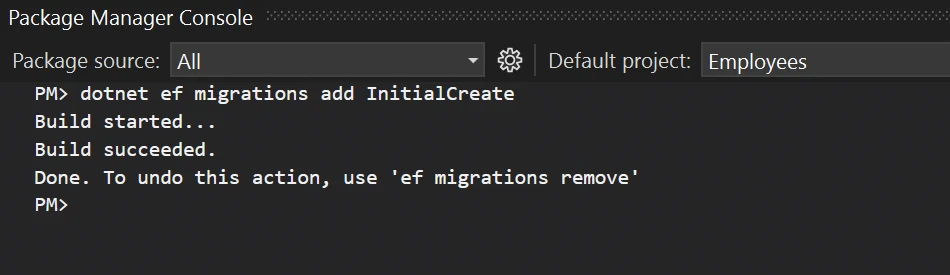
The initial migration is creating our database for the first time. Entity Framework Core will scaffold our database, create the SQL necessary to create it and execute it. We start by opening up our Package Manager terminal and running the following commands:
dotnet ef migrations add InitialCreate
You should see something like this:
Then run the following command in the Package Manager Console:
dotnet ef database update
Now, when you open up Data\Employees.db, it should look like this:
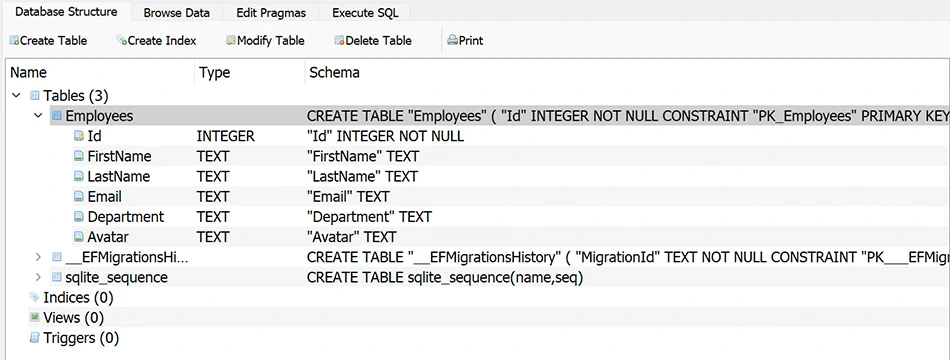
Now we’ve created our database.
Let’s add some data to it.
6. Seeding the Database
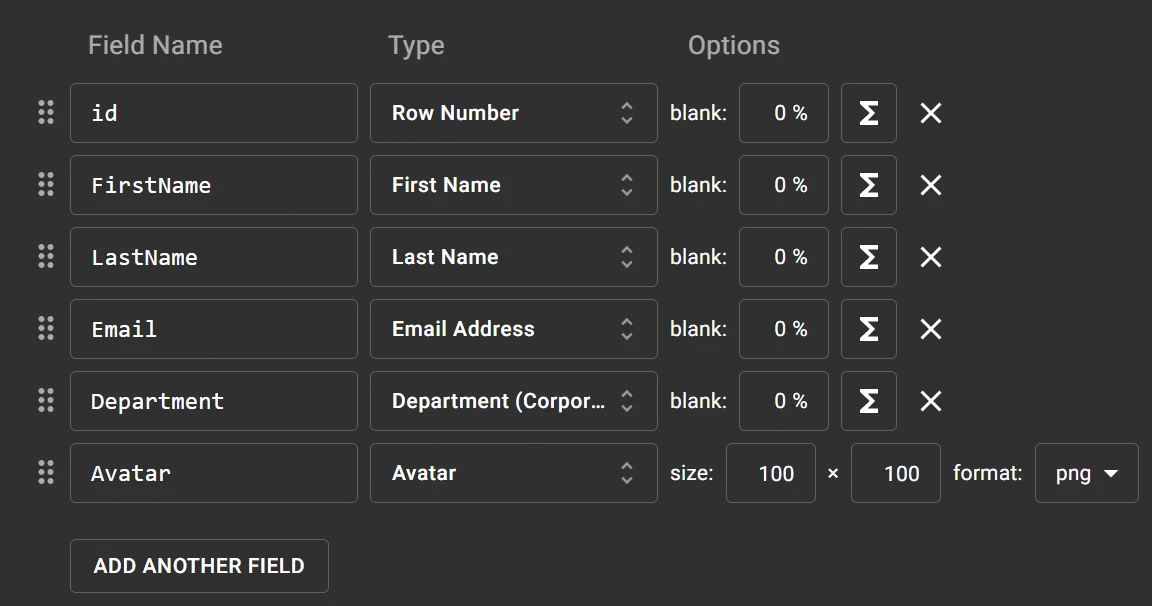
To use this database, it needs to have some data. I’m going to use Mockaroo for this project to create some fake employee data we can use for our application.
Here’s what our schema will look like:
I have downloaded the mock data and saved it into the Data folder of the application.
So now I have a nice CSV file with the mock data. There are two ways I can put it into the database. I can import the .csv into SQLite, using DB Browser or the SQLite command prompt. But I want this data to be seeded by my application.
Open up EmployeeContext.cs and add in the following method:
protected override void OnModelCreating(ModelBuilder modelBuilder)
        {
            modelBuilder.Entity<Employee>()
                .ToTable("Employee");

                modelBuilder.Entity<Employee>()
                    .HasData(
                        new Employee
                        {
                            Id = 1,
                            FirstName = "Nonie",
                            LastName = "Morgue",
                            Email = "nmorgue0@disqus.com",
                            Department = "Research and Development",
                            Avatar = "https://robohash.org/autautea.png?size=100x100&set=set1"
                        }
                    );
        }
As you can see, we’re creating a new Employee to insert into the database. We want to do this for all 100 employees we’ve created though. Yikes.
We can automate this with NimbleText. You can get a copy of NimbleText free, however I highly reccomend getting the pro version. It will save you tons of time.
Load up NimbleText
In the top section, paste in your CSV data:
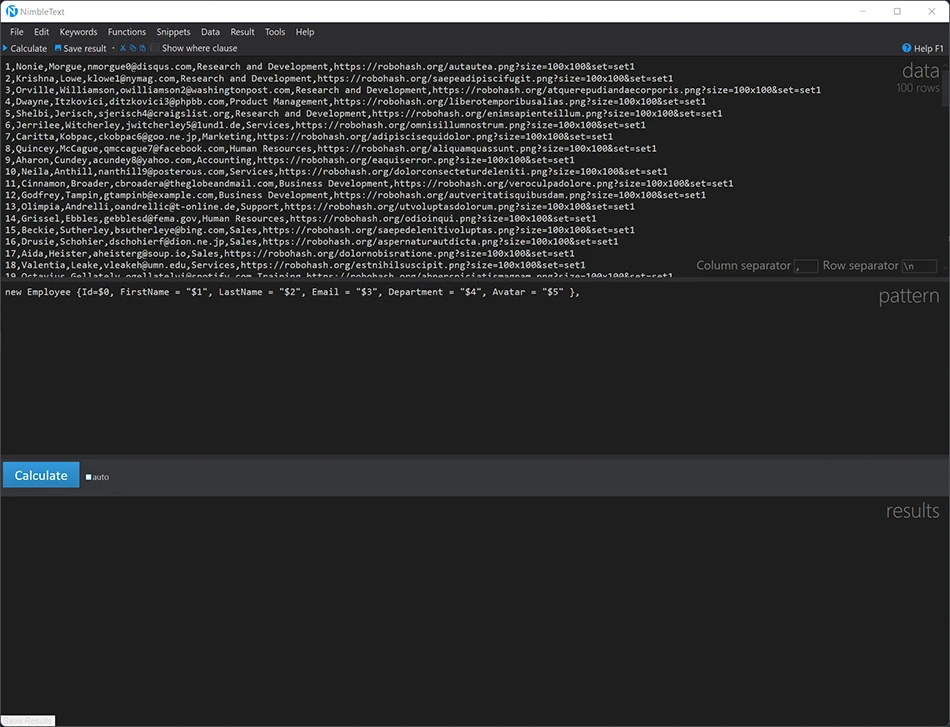
In the second section paste in this code:
new Employee { Id = $0, FirstName = "$1", LastName = "$2", Email = "$3", Department = "$4", Avatar = "$5" },
This will automatically generate the C# code you need to populate this database. Then run Nimbletext, and your final code should look like this:
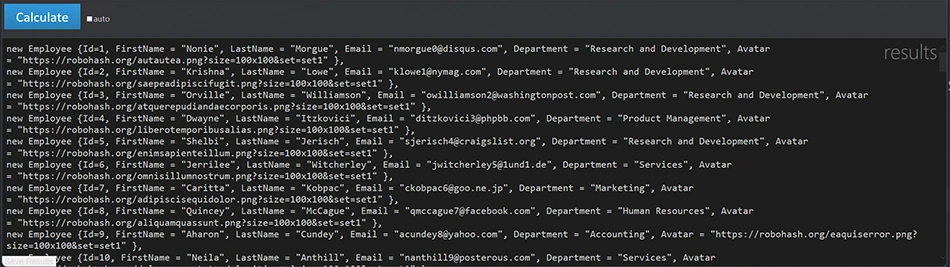
And now you can drop it in your code:

and now it’s ready to run:
dotnet ef migrations add SeedData
If that doesn’t show any errors, you can update the database:
dotnet ef database update
Awesome, we now have data in our database.
![How to use SQLite in Blazor][19]
This is known as seeding the database, and it only happens once when it’s created. This gives us data to start within our application. Once this application is built for the first time, it will populate this data into the database.
Next in part four, we’re going to get to the real meat of the operation. We’ll set up CRUD (create, read, update delete) operations for our application.